Eldrum: Untold walkthrough
Spoiler warning: this guide reveals story events, choices and endings.

Introduction
Before we start I have to highly recommend playing Untold with as little aid as possible. There are many secrets to uncover, many alternate routes to take. As such, multiple playthroughs can be very enjoyable. This guide will try not to go into too much story/lore details, but still feature many spoilers and focus on a min/max style play through.
Untold doesn’t have to be played this way! For example, after the first few forced initial encounters, you can actually beat the game without killing anything again. Play it your way.
Ideal Character Stats
Untold has many actions and routes locked behind your characters stats. Not all of these routes are “ideal” from a power gaming point of view but will still be mentioned as many are worth viewing. Having too much of a stat may actually lock you out from viewing a certain path. As an example, you could have 3 charisma and pass a persuasion check, but you’ll never see the route for only having 2 charisma and failing the check. As such, when wanting to discover new routes yourself, you can save your stat points and save/reload the game, checking things with different stats increased.
Charisma (CHA): Only 1 point ever needs to be added for the entire game. Thanks to secret items and hidden equipment, you can increase charisma to high amounts without issue. 5 CHA is needed for a certain ending, 8 CHA gives you the max discount at nearly every shop. Any more than 8 can give you higher selling prices depending on the merchants CHA, but this really isn’t needed.
2 CHA can be gained really early on from eating Strange Fruit. 2 bonus CHA can be gained from wearing equipment found in the Tomb of Hieronymus and further bonus CHA from certain randomly found equipment. Further increases can be permanently gained from buying and using Exotic Perfume, found at the hidden thieves guild. In reality, you wouldn’t have to buy any Exotic Perfume, just simply equip your CHA increasing items when needed.
Perception (PER): 2-3 perception is needed to find many secrets in Untold. Some end game items need 4-5 PER to find. This is one of the most important stats for end game as the last boss is very slippery and hard to hit. High perception will help with this. Thankfully in the final area, there's a secret shop that sells Sacred Elixir that permanently increases perception. It’s expensive, but if playing optimally you can buy many of them.
As such, you can actually leave perception at 3 for most of the game. 2 PER is needed for all secrets on the first island, 3 PER for all the secrets until the last town. Increasing it further than 3 using your own points isn’t the worst thing, especially to offset the -1 PER you get from wearing the Gotterdammerung.
Resilience (RES): Unfortunately resilience isn’t a good stat to increase. Each point only gives you 5 more max health and a little protection (+1 for every 2 points). There’s a few encounters in which having a higher RES helps with, but due to healing items this really isn’t an issue. RES can still be useful for a shield using character as each point adds 2% block chance, but I find STR & AGI much more important to raise.
RES can easily be left at 1 point for the entire game.
Agility (AGI): This is a very important stat. One example is that 3 agility is needed quite early in the game to access a closed area.
AGI helps you a lot in combat (you get your turns more often and dodge more attacks) and succeeding in certain actions like sneaking/ambushes. (Also bypassing certain encounters, but we’ll be fighting most encounters anyway for the exp/items).
You’ll be splitting most of your points between this and strength (maybe some extra perception).
Strength (STR): Another important stat, especially if you want to use a tank type character with lots of armor and a heavy weapon. The more STR you have, the harder you hit and the more armor and heavier weapons you can equip.
Some leave their STR at 3, but personally I like getting much more so I can wear heavier gear.
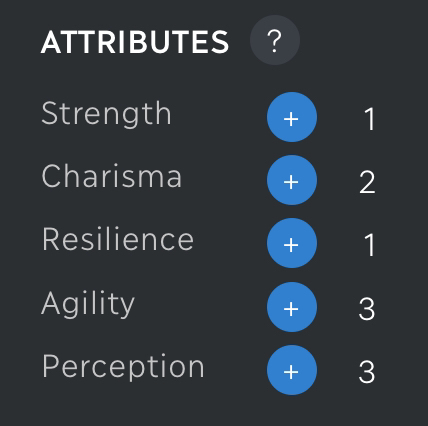
So in effect, you only ever have to spend 5 points to unlock the most ideal content. This still gives you plenty of points to play with as you like.
General Gameplay Tips
Save Scumming
Untold has a random aspect to the loot you find from locations and enemies. This means to get the best loot, you may have to reload that search/fight. The tables are fixed though, so you can work out what drops from a location. The most hardcore of players may reload that loot drop many, many times until you get the best possible outcome. That game style isn’t for everyone though.
At the very least, you may want to reload to get a certain important item, such as a Strange Fruit drop from fighting a certain druid, or finding a Crude Lock Pick from a fixed location.
This also means one could play an Iron Man style game, no saves or reloads allowed. Just make do with what you have!
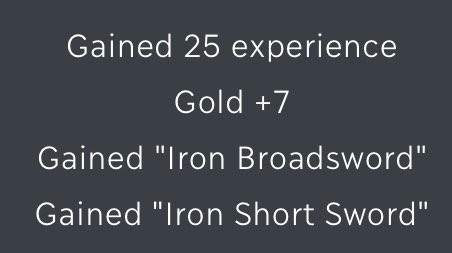
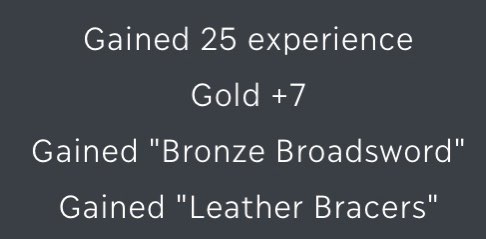
Different items dropping from the same encounter when repeated.
Avoid Selling Items
Most items can be sold to merchants, but you’ll want to avoid selling items as much as possible, at least until you have a high CHA. You’ll be wanting the most bang for your buck, especially as you can buy stat increasing items. There’s also an end game merchant, an Antiquarian that will buy certain items for a high price.


Price offered with 2 charisma. Price offered with 3 charisma.

Price offered with 4 charisma.
The Antiquarian
Near the end of the game in Noble Heights, you can barter some of your treasures to an Antiquarian for extra gold. Very useful if you need to improve your equipment to take on the final boss. Some items he’ll look at but not buy, and some items he’ll offer you more gold depending on your CHA.
I’ll list what items can be viewed as we find them and provide the full list of items later in the guide.
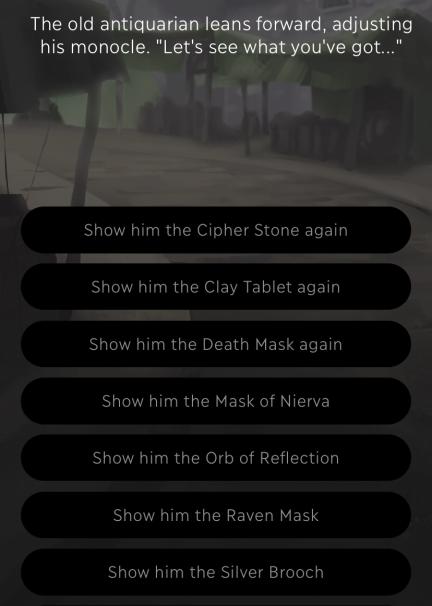
A quick glimpse at some of the items you can show him.
Item Values
Items mentioned in this guide will have their base gold value noted.
This doesn’t represent how much they will sell for.
That all depends on your CHA vs the merchants CHA. However, the higher value will mean the better the item for selling, so if in doubt what to loot, choose the combo of items with the higher overall gold value.
Depending on what can be looted from a single encounter, I may list items with a format such as this: (d5-10) (damage between 5-10), (a10) (armor 10), (v10) (value 10) next to their names. For shields, they will have (b10%) (block chance 10%).
You’ll usually find that equipment with more armor will have a higher encumbrance. Everything you have equipped counts towards your max encumbrance (your level + 3 × (STR + 1)), and you can’t equip anything that would take you over it. Weapons are slightly different as some may be 1 handed thus letting you also equip a bow or shield, otherwise 2 handed. If you lack STR then you may have to balance what you equip for certain encounters. In this guide I won’t be listing how much an item weighs or what specials they have (unless it’s an important notice). There would be just too much information as there's a lot of different lootables. Just remember the rule of thumb; that the higher the armor the more it may weigh. Check for yourself in game. I’ll leave it up to the player to decide on what they want, based on value, stats and play style.
As gold is finite I’ll always be leaning towards items with a higher value.
The only information you won’t see is the item's value.
Advantage Points Stacking
Different weapons have different combat actions, such as Cleave, Stab or Slam. If using a Stone Maul for example, the Slam attack is so powerful that certain enemies can die in 1 hit.
These all cost advantage points as well as 1 of your 3 actions for the turn. You mainly gain advantage from basic attacks that hit, and a little from blocking and dodging.
Your advantage meter carries over from one fight to the next until you leave the area.
As a mid-game example, you have the option of fighting a Bandit Chief and his cronies. If you assault the bridge you’ll have to fight a number of them all in the same location. You can avoid using your combat actions on 1 bandit, and use the filled meter right away for the next fight. This means when you get to the powerful chief, you can deploy a full meter right away for an easier fight.
This strategy is a big help against the famous Ironclad Vagrant.
As you attack, the blue will increase, letting you perform a combat action.
Changing Equipment
You can’t change your equipment during a fight, and a fight starts as soon as you pick the option that leads to it. Outside of combat though, you can open your inventory between any two choices.
Use that before committing to a fight: save the game, heal yourself or equip the right weapon for it. Maybe your character is wearing a disguise, and you’ll want to switch to better armor before choosing to fight, (then change back into the disguise after the fight is over).
This also means that you could have a bow equipped for an out of fight attack, then swap to a 2 handed weapon before choosing the option that starts the actual fight. Same goes for the -1 PER helmet Gotterdammerung. You can equip it only for fights if you're searching for secrets and only have 3 base PER.
Even after a surprise attack, the fight won’t start until you confirm.
Defending
The old counter-attack button is gone now that combat is turn-based. Dodging and blocking happen automatically, and each successful dodge or block also adds a little to your advantage meter. You can still take some control of your defence: spend an action on the Defensive stance (more protection and block chance for 3 turns), or use Parry if your weapon has it, which stops the next attack and gives you a big chunk of advantage.
Shipwrecked
“Washed ashore, you have only vague recollections of what happened. The past seems unimportant now. Shivering, you watch the bodies float among the debris. No ships can be seen on the horizon.”
Ignore the footprints for now. Explore the western plains, explore the south, and walk to the southern shore. Check the toolshed and take the Shovel (v10). You can now head back north and use the big circle at the bottom of the screen to open the map and head back to the beach.
You can now follow the footprints.
Take the knife and move on
You’ll gain 1 weak weapon, either a Small Rusty Kitchen Knife, Rusty Cooking Knife, Rusty Cutlery, Rusty Eating Knife or Rusty Bread Knife. It doesn’t matter at all, as they’re all identical now: a damage of 1-2 with the Stab action and a base value of 1, (d1-2) (v1).
The knife will be equipped automatically. Take a look around, explore the lagoon.
Salvage something useful
You can get 2 different armors here: one for your feet, head or hands, and one for your body, each from a random selection of items. For the sake of completion I’ll list them all, you may want to spend some time reloading here to get two decent armor equips or 2 high value equips (for selling much later). Gold found will always be between 4-15.
Items with armor of 1: Red Cloth Sandals (v3), Fur Hat (v5), Black Toga (v6), White Toga (v6), Black Linen Cloak (v6), Patchwork Fur Cloak (v10), Black Silk Tunic (v25).
Items with armor of 2: Large Fur Boots (v8), Leather Helmet (v10), Leather Boots (v12), Sturdy Leather Gauntlets (v22), Black Leather Boots (v22), Black Leather Helmet (v25), Heavy Fur Coat (v25), Brown Leather Cloak (v30).
Needless to say, the grand prize here would be claiming 15 gold along with a Brown Leather Cloak and another high value item.
Equip your new armor then proceed to cross the shallows. You’ll be attacked by a wild dog. Killing it will give 20 experience points.
Finish crossing the shallows, you’ll come across a shack and more footprints. Once again ignore the footprints and head inside the shack.
The Shack
Open the pouch to gain 1-4 Red Apple (v1), 6-12 Strawberry (v1) and 2-4 Pear (v1). One can eat these to heal when in a pinch.
Take the knife and equip your new Bronze Hunting Knife (d2-3) (v20). Climb the ladder, you can find Factotum’s Journal (v5).
Go back outside, and you’ll be confronted by a grey dog. You can ignore it, but that's precious exp you're missing. It’s a lot tougher than the last dog so expect to get hurt. If the first dog roughed you up, eat some of that fruit first, as you can’t use items once the fight starts. You’ll claim 20 exp and a level up. Raise your CHA first. Not only will you need 2 CHA to unlock a secret NPC but taking it this early lets Rasleen open up a bit more about her past.
Take a look behind the shack, and you’ll come across a grave marker. Thanks to the Shovel you can dig up the grave, and find a casket. Open the casket, examine the bones, and you’ll find a rusty metal box.
Open the box to find between 10-20 gold and a Bronze Mallet (d1-7) (v20).
Head back to the shack and follow the footprints. Keep going across the bridge and approach the camp.
Search the camp
You can find a Small Book (v8) to read and between 1-3 Dog Steak (v1) when taking the food.
There's a severely injured druid, take a closer look at the wounded man and rifle through his pockets to find Iron Key, No. 8 (v0). This will be used later to unlock a room. It’s up to you if you want to put him out of his misery or not.
Follow the footprints, and head towards the summit. On the way you can stop to think about the past, for a creepy flashback from the ship. Your answer doesn’t change anything. We’ve finally found the owner of all those footprints.
Rasleen
“The short woman is quite young, but the scars on her face are like the rings of a tree. Her dark brown eyes are wide open and full of rage. They have the same color as her close-cropped hair. You remember those eyes from the ship. Down in the dark cages below deck, they were shining like beacons of pain and sorrow.”
Approach Rasleen, ask her anything you like and show her the silver brooch. Keep talking, you’ll update your shipwrecked quest, gain 100 exp and a level up. Now increase your PER to 2. This will enable you to find many secrets on this island.
Unmask a dead cultist, and you can claim a Raven Mask (a1) (v0). Feel free to equip it for the extra protection but do take note that the cultists are at war with the druids, and wearing this mask may trigger certain druids to attack you. These masks can be sold to the antiquarian later in the game.
Guard the area
The Apostles of Woe have sent reinforcements, and you’ll have to make a choice; either check the stockpile for a better weapon or start fighting straight away. Based on your choice you'll fight different cultists. Both routes can give the same exp, but ultimately it's a choice of what new weapon you want. Checking the stockpile lets you choose a random sword, axe or blunt weapon. Fighting right away can let you claim a dagger from the last foe. Here's the kicker… you can find a Stone Maul (d8-25) (v20) from the blunt stockpile which is a VERY overpowered weapon. It’s very heavy with an encumbrance of 8, needs both hands and slows you down, and right now you can only wear 9 encumbrance worth of gear, so you’ll have to take off most of your armor to swing it. But two hits usually build up enough advantage for a Slam on the same turn, which is often enough to finish a cultist off. However, one of the daggers dropped if you avoid the stockpile is a Volcanic Stone Dagger (d3-8) (v60). It’s light with only 2 encumbrance, gives you +1 AGI (which counts for AGI checks!) and better accuracy, and sells for a lot more.
So make your choice! If you’ve never experienced the Stone Maul, it’s worth testing out.
Vanguard route
Fight your way out. A slightly tougher route as you won’t have an upgraded weapon. You’ll engage the enemies before Rasleen and face an Apostle swinging a hatchet for 30 exp. (All the cultists here simply show up as Apostles now.)
Now you have a choice. Flanking the enemy lets you fight an Apostle with an iron mace for 30 exp. This guy doesn’t drop anything though. So instead, attack from the rear to fight a female Apostle. She also gives 30 exp and drops just 1 item. Either a Bone Dagger (d3-7) (v40), or the much better Volcanic Stone Dagger (d3-8) (v60).
Otherwise...
Stockpile route
Only 1 weapon is obtained.
Grab a sword: Rusty Iron Broadsword (d5-6) (v16), Rusty Iron Longsword (d6-7) (v26), Rusty Iron Gladius (d3-5) (v12), Rusty Iron Claymore (d9-12) (v28), Rusty Iron Sabre (d6-8) (v35), Rusty Iron Short Blade (d3-4) (v14).
Grab an axe: Bronze Hatchet (d5-6) (v18), Rusty Iron War Axe (d6-8) (v20), Rusty Iron Battle Axe (d7-10) (v22), Rusty Iron Halberd (d7-11) (v26), Rusty Iron Hatchet (d6-7) (v24), Stone Axe (d3-8) (v6).
Grab a blunt weapon: Bronze Scepter (d2-8) (v8), Rusty Iron Mace (d2-8) (v10), Rusty Iron Flail (d1-10) (v22), Rusty Iron Morning Star (d3-12) (v22), Stone Maul (d8-25) (v20).
Do note that the Rusty Iron Sabre and Rusty Iron Hatchet have slightly lower drop rates than the other weapons.
Equip your new weapon and fight your way out! The Apostle with a sword in each hand gives you 30 exp.
Hurry onwards but spotting an elderly cultist leaves you with a choice. If you charge him he’ll throw his flask in your face for 20 damage, which is game over if you’re low on health (you do still get a free hit on him afterwards). If you look at him first you can prepare to dodge his flask attack and get a free attack on him before engaging. The Alchemist of Woe gives you 20 exp. Running away altogether is the better option. You’ll fight a tougher Apostle, a lumbering brute with a heavy mace, but get 30 exp for it.
Regardless of the route you took you arrive at the same choice.
Escape from the grove
After that onslaught you should have leveled up again. Increase your AGI to 2. We want to get 3 AGI, so we can access a hidden location coming up.
You’ll reach a safe area and rest to fully recover your health. Before following the noise, walk towards the ocean and forage the first hill.
Foraging: 3-12 Raspberry (v1), 2-8 Pear (v1), 3-12 Blueberry (v1).
Just some emergency healing foods.
Follow the noise and keep moving. You’ll reach a bridge and trouble will arise when you cross it.
Cross the bridge
Before crossing the bridge you can talk to Rasleen and try to gain some more information. If you only have 1 CHA then in response to “Tell me more about Triad Apex” she’ll ignore the request, telling you to pay attention. With 2 CHA she’ll respond to the request.
While crossing the bridge Rasleen will get struck by an arrow. If you try to escape you’ll just take an arrow in the leg (10 damage), the archer won’t let you get away. Run to the entrance to engage the archer.
Druid Archer: 25 exp, 6-12 gold, Fur Tunic (a1) (v10), Cloth Bracers (a1) (v6), Bandages (v5).
Dusk Megalith
"Got hit by a poison-tipped arrow. You gotta find the antidote, or I'm dead, simple as that. I'll stay behind, for now…"
You now have two main objectives. Find an Antidote before Rasleen dies and locate a ship, so you can escape this island. The Antidote quest isn’t timed so don’t feel you have to rush. There are multiple ways to get one.
You can talk to Rasleen. If wearing a Raven Mask she’ll advise you to remove it. Sensible, as some druids will attack you on sight. The cavern is too dark to explore so head to the northern ruins and climb the mountain.
Once there you can look around to find a Torch (v2). This will enable you to explore the cavern. You can also forage the bushes once for 4-9 Strawberry (v1). Exploring the wilderness lets you find a boulder in a pit, as long as you have at least 2 PER. We can’t remove the boulder without a certain item (Heavy Iron Lever), so we’ll come back later. The monument has unreadable hieroglyphs until you find the Cipher Stone.
Using the map you can return to the Pylon, however... we can trigger two different random encounters while traveling between the Triad Apex and Pylon.
Traveling south can trigger a wolf attack. It’s possible to run away but defeating the Dusk Wolf will net you 40 exp.
Traveling north can trigger a lion attack. Once again you can run away, but defeating the Mountain Lion will net you 25 exp.
Now we have two major areas to explore, and some backtracking will be needed. Let's check the cavern first.
Chapels (First Visit)
Using the Torch you can now explore this area via entering the cavern. It’s quite the dangerous place, be wary!
You can listen to the first chant safely and keep walking. Exploring the first chapel without the correct disguise will trigger a game over, so avoid for now.
The second chapel is safe to explore. This is where you can find the Cipher Stone (v500). This is an extremely valuable find! Avoid selling it until the end of the game. Not only will it sell to the Antiquarian, but it's useful in decoding the druids hieroglyphs as we venture.
Proceed further and avoid listening to the chant outside the third chapel, or you’ll get a game over. You also can’t explore this chapel without the correct disguise, so once again we’ll come back later.
Explore the end of the hallway and explore the dark chamber. You can grab another Raven Mask but not much else. When trying to leave you’ll be confronted by a Druid Assassin. Don’t attack her! Even if you win, it will be game over. The game even gives you a warning the first time you try. Retreat and you can ambush her for some free damage thanks to your 2 AGI, otherwise the ambush would fail. She can be a tough opponent with plenty of health who gets her turns more often than you do, and her Hamstring attacks slow you down even further, so if you want to leave this fight for later, don’t enter the dark chamber. She drops some very good items.
Druid Assassin: 50 exp, 16-34 gold, Iron Key, No. 17 (v0), Mask of Nierva (a1) (v0).
1 random drop - Iron Bracelets (a3) (v40), Bronze Gladius (d4-6) (v25), Fine Bronze Sabre (d6-8) (v42), Iron Short Sword (d6-7) (v35).
The Iron Bracelets are superb for armor right now, though at 5 encumbrance you may have to drop something else to wear them. We’ll be using that key soon. The Mask of Nierva will let you enter the third chapel when you equip it alongside a Green Cloak, and can also be sold to the antiquarian. A Green Cloak also lets you enter the first chapel, but we haven’t found one yet.
After defeating the Druid Assassin you’ll be just short of level 5 (unless both the wolf and the lion jumped you on the mountain path). Finding the ship or eating a few Moon Orchids (5 exp each) will get you there soon, and then we can increase AGI to 3. Hide the body if you wish. It’s time to leave the chapels (for now) and head back to the Pylon to explore the eastern ruins.
Explore the garden
When in the garden you’ll find a cavern entrance guarded by a druid. Now there's a lot of different things that can happen here, but one route is by far the best one. If you talk to the druid and say the correct things you can unlock an encounter with a secret character called Mev. I’ll explain later why this is the best route. For completions’ sake I’ll list all the subpar routes.
Fighting route
If wearing the Raven Mask he’ll attack you. You can attack the Druid Guard out right or try to sneak behind him for an ambush or chokehold. Sneaking requires 2 AGI, so if you fail the sneak he throws a javelin at you. Dodging is a bad idea and gets you hurt, you can actually catch it if you have 3 STR and even throw it back, which hits him if you have at least 2 PER (and hits harder with 3 PER). If you ambush him you’ll damage him, (with 3 AGI you even strike the back of his head twice). Chokehold is a bad idea especially if you lack STR.
Phew, we digested all that? Well it's not over yet! If you turn back early or after having a bad conversation with him or a bad bribe, when you return he’ll have two friends waiting for you and you’ll have to face the 3 of them one after the other. During this wave fight, after defeating the Druid Gardener, the Druid Guard will throw a javelin at you, which will hurt unless you have at least 2 RES.
Druid Swordsman: 25 exp, 2-6 gold, Pear (v1).
1 random drop - Bronze Longsword (d7-8) (v40), Leather Sandals (a1) (v16), Leather Bracers (a2) (v20), Amethyst (v30).
Druid Gardener: 25 exp, 2-5 gold, Wolf Necklace (v10), Wooden Bracelet (v10).
1 random drop - Iron Circlet (a2) (v15), Leather Shoes (a2) (v8).
1 random drop - Heavy Iron Scythe (d3-24) (v54), Heavy Bronze Scythe (d1-16) (v36).
1 random drop - 2-3 Pear (v1), 1-2 Moon Orchid (v50), 1-2 Pale Hyacinth (v30), 2-3 Red Apple (v1).
Please note that the gardener drops some decent items. The Wolf Necklace and Wooden Bracelet can be sold to the Antiquarian. The Wooden Bracelet is an accessory that grants 1 protection and sells for more. The Heavy Iron Scythe has a slightly lower drop rate as it's quite powerful. Moon Orchid is a special plant that gives 5 exp if eaten.
Druid Guard: 30 exp, 3-9 gold, 1-3 Bronze Javelin (d1-11) (v30).
1 random drop - Bronze Halberd (d8-12) (v40), Fine Bronze Halberd (d9-13) (v60).
1 random drop - Brown Leather Gambeson (a2) (v50), Brown Leather Gloves (a2) (v16), Brown Leather Helmet (a2) (v25), Brown Leather Boots (a2) (v18).
Note that the Fine Bronze Halberd and Brown Leather Gambeson have slightly lower drop rates.
Some of that stuff is quite good yes? Well the Mev route is even better, I assure you.
Discover Mev route
Make sure you aren’t wearing a Raven Mask. Talking to the guard without at least 2 CHA is a bad idea. If you say the wrong things then the Mev route will be locked, and you’ll never find her. Regardless of all the different things you can say, there's only 1 path of conversation you should take.
Talk to the guard and take these choices;
- “I’m a merchant, looking to trade.”
- “Little bit of this, little bit of that.”
- “Where can I find her?”
- Bribe the guard.
- 25 Gold.
You can ask “Who’s Mev” and ask about the Sorority of Nierva to find out more information. You can successfully bribe the guard just 10 gold if you have 3 CHA, but thanks to some CHA increasing items we’ll soon find, manually boosting your CHA past 2 is a bad idea.
All set, Mev will find you soon enough. You’ll see later why finding her is the better route.
Some of you may be upset that you can’t attack the druid guard doing this path, even when wearing a Raven Mask. Well someone has to pass on the message to Mev. Besides, think about how much trouble he’ll be in for letting you past him and stealing a ship.
Before leaving, we can search the garden for some flowers.
Pick some flowers
When first checking for flowers you can find;
1-5 Cloud Petal (v10), 1-6 Gray Snapdragon (v2), 1-2 Luminous Rose (v10), 1-5 Pale Hyacinth (v30), 1-4 Moon Orchid (v50).
The Moon Orchid are noteworthy, eating them gives 5 exp each.
You can search further for more flowers and this is where you can find a super secret Strange Fruit! Bad news… it's like a 1% drop. If you want it then be prepared to reload the game many times. Is it worth it? Of course, as eating it gives you a permanent +1 boost to CHA, (-5 hp).
If you find one… DON’T EAT IT (yet). There are certain interactions coming up in the game that require just 2 CHA to see and no more. Before we leave this island we’ll make a backup save file giving us options for alternate routes (for your viewing pleasure). You’ll be able to eat that Strange Fruit anytime for that CHA boost when needed.
Pick some more flowers:
1-2 Noxious Weed (v1), 1-2 Toxic Nettle (v5).
99% chance - 1-2 Thorn of Meym (v40) or 1% chance - Strange Fruit (v0).
It’s also worth noting that a Thorn of Meym is needed to craft the Antidote. Not a biggie as there’s a few ways to obtain one, but finding the Strange Fruit will lock you out from this.
For added fun and games try eating some of these flowers/weeds when you're very low on health. (I take zero responsibility for what happens).
Before going further, feel free to backtrack to translate the hieroglyphs or speak to Rasleen about your findings.
Now we are free to enter the cavern, Torch needed of course.
Living Quarters
This is where we can use those keys to unlock some rooms. Downstairs there's a prison, but we have no means of opening the gate. The bright passage leads to Port Spire.
Door number eight
A Green Cloak (a1) (v0) can be found inside the wardrobe. Wearing this will help disguise you and blend in with the druids (masks and stats dependent in some cases). You’ll want to equip this immediately. If a fight looks likely, switch armor before you choose to fight; once the fight starts you can’t change your gear.
Chest of Drawers: 7-18 gold
1 random drop - Iron Sickle (d6) (v32), Wolf Gauntlets (a2) (v35), Copper Ring (v10), Crude Lock Pick (v3).
The Crude Lock Pick is very useful, letting us access certain objects/areas. One can be brought from Mev, so if you took her route you can quite happily get a higher value item here.
Take the moccasins: A pair of Fur Moccasins (a1) (v30) is lying on the floor.
Look under the bed: With at least 2 PER you’ll spot an Amethyst (v30) hidden behind the chamber pot.
Door number seventeen
The first wardrobe is empty. Another Green Cloak (a1) (v0) is found in the second wardrobe. The third wardrobe is empty unless you have 2 PER, letting you find a readable Pamphlet: The Age of Dusk (v1).
There's also nothing under the beds, but we do have an iron strongbox in the room.
This can only be opened if you have the Crude Lock Pick and at least 2 AGI.
Iron Strongbox: 57-148 gold, 0-4 Amethyst (v30).
Door number eleven
This room will only be accessible when you find the Iron Key, No. 11 (v0) from the tavern in Port Spire (2 PER). Inside you can find a couple of books to read as well as a recipe to craft the Antidote yourself. Rasleen can be told about finding this. The actual Antidote can be made at the Lighthouse in Port Spire.
Examine the book piles: The Transgression of Hieram Vot (v20).
Examine the parchments: Odaia's Book of Memories, vol. 41 (v5), Recipe: Antidote (v50).
Druid Scoundrel
This is a slightly random encounter when traveling to the living quarters via the map. Once again, wearing Raven Mask will provoke this druid. Turning back also makes her suspicious. It’s possible to keep walking past her while wearing a Green Cloak, but she can drop another Strange Fruit.
Druid Scoundrel: 40 exp, 6-47 gold,
1 random drop - Iron Rapier (d2-5) (v25), Bronze Scimitar (d5-7) (v30), Rusty Iron Butcher Knife (d4) (v15), Bronze Punch Dagger (d1-5) (v18).
1 random drop - Strange Fruit (v0), Black Leather Gloves (a2) (v18), Crimson Veil (a1) (v10), Expensive Fur Coat (a1) (v80).
Needless to say, regardless of how good the other items are, you’ll be wanting a Strange Fruit.
Port Spire
Welcome to Port Spire! This is where we’ll find a ship to steal, a few buildings to explore and a few NPC’s to interact with.
You can approach the ship and gain 25 exp for locating it. If only we had a crew.
Merchant
Naturally, the Merchant will have a few items for sale. The only thing you may want to consider buying would be Bandages. They heal you for 12 points and have 3 uses. A couple may be needed for exploring the underworld (soon) and 3 will be needed for a trade later on. However, it’s worth noting that druid prison guards can also drop Bandages, as well as dropping from thugs in the town of Set. They also get more expensive in the next town.
I won’t be listing how much each item costs as that completely depends on your characters CHA.
Merchant Stock:
- Iron Dagger (d3-7) (v28)
- Iron Scepter (d4-10) (v30)
- Black Turban (a2) (v3)
- Bronze Buckler (b12%) (v18)
- Leather Buckler (b10%) (v12)
- Red Cloak (a2) (v8)
- Studded Leather Cuirass (a3) (v55)
- Bandages (v5)
You can get some information from the merchant and even ask about the Antidote that Rasleen needs. You need at least 2 CHA, or he won’t help you. He’ll sell you an Antidote (v30) for 100 gold, but you can barter him down to 75 gold if you have 3 CHA. Threatening him does nothing.
DON’T BUY IT. We can find the Antidote elsewhere.
Later on the merchant can actually be invited onto the ship before you’re ready to set sail. He’ll even pay you if you demand it (2 CHA giving you 25 gold). He’ll move locations and can still be accessed from the ship until you leave.
Explore the harbor, and we’ll have 4 locations to check.
The Lighthouse
This is where we can brew an Antidote ourselves if you manage to find the recipe.
Recipe: Antidote is found in door number eleven, with the key to that room found in the tavern.
You can search the room for an Empty Flask (v1) and start boiling some water. The ingredients can be checked by reading Recipe: Antidote. Easy to make unless you’ve eaten all the ingredients or took the time to find the Strange Fruit instead of the Thorn of Meym back in the gardens. Finishing the brew is worth 25 exp, on top of the usual 75 exp quest update.
The Warehouse
Using the Cipher Stone will tell you this is a pantry, however the door is locked. If you have 3 STR you can kick in the door or simply use the Crude Lock Pick for access.
Clear the shelves: 2-6 Goat’s Milk (v1).
Empty the baskets: 2-6 Red Apple (v1), 2-6 Pear (v1).
Empty the clay pots: 2-6 Strawberry (v1), 2-6 Raspberry (v1), 2-6 Blueberry (v1).
The Tower House
Using the Cipher Stone will tell you this is a barracks, but the door is barred from the inside. Looking up, it may be possible to scale the wall. You’ll need 3 AGI for this, or you won’t make it. Having 2 AGI gets you hurt, and you won’t even attempt to climb with 1.
Once climbed you can go downstairs but will need a Torch to go any further. You can check the cupboard to find an Antidote! If you take it then the quest will update, and you’ll get 75 exp… however…
You may not necessarily want to take the Antidote just yet. The reason I say this is it will trigger the prison section after talking to Rasleen. Maybe you’re playing the demo, or maybe you won’t want to trigger this yet and want to talk to Rasleen about finding the recipe (coming up).
We can come back for it anytime.
Head downstairs and look around. Search the dormitory, and you’ll find someone hiding; Arvie Graker the opium fiend. He’s in debt and hiding from a psycho druid bitch (Hmm… I wonder who that is).
Fun fact! The name Arvie Graker is a super secret easter egg in reference to a friend of one of the developers.
If you attack him he’ll drop: 10 exp, 3-5 gold, Shiv (d1-4) (v1), Slouch Hat (a1) (v1), Clogs (a1) (v1), Filthy Pipe (v1), Sackcloth Tunic (a1) (v2).
I would advise against this. You can come back later and invite him on the ship for 20 exp and/or reveal his location to the person looking for him. You can get 3 gold from him to buy your silence (but can still sell him out anyway).
The Tavern
The Cipher Stone tells you this is called The Merchant’s Refuge. Heading upstairs we can find Iron Key, No. 11 (v0) (2 PER), you should already know where to use this.
Spending some time upstairs you can loot all the corpses, then when leaving, make a story choice based on your actions.
Plunder the corpses: 1-2 Bronze Ankle Bracelet (v11), 1 Wooden Hand (v10), 1 Glass Eye (v1), 1-2 Silver Earrings (v14).
A Bronze Ankle Bracelet is an accessory that gives 1 protection. Both those and the Wooden Hand can be sold to the Antiquarian.
After we have left the Tavern, if you took the discover Mev route, then explore the harbor again and someone will tap our shoulder. As this is my favorite character in the game, she’ll be getting her very own section.
(For fun and games, try wearing a Raven Mask before doing this. Again, I hold zero responsibility for what happens.)
Mev
“...last but not least, the Sorority of Nierva. Long story short, they represent the chaotic side of things. They’re all ruthless, a bunch of scoundrels and rogues, who excel in murder, extortion and mayhem. Mev is a shining example. She’s… emblematic. Catch my drift?”
If you’ve skipped ahead and are unsure how to find Mev, then please view the “Discover Mev route” earlier in the guide.
Mev is very… unique. Talk with her as you see fit, but you may want to be polite. If you annoy her, you can dodge her attack with at least 2 AGI. After first meeting her she can then be found inside the Tavern.
Mev gets annoyed easily and isn’t afraid to punish you for it, even giving us an opportunity to fight back. She does give some very tasty exp and a great weapon for killing her BUT she’s rather strong, so I advise dealing with her later. She’s after Arvie Graker and will reward you for telling her his location. Furthermore, she can also be invited onto the ship, giving us extra interactions.
As such, I strongly advise players making a backup save file with these choices undecided:
- Prisoners not freed.
- Strange Fruit uneaten with CHA remaining at 2.
- Merchant not invited on the ship.
- Mev alive.
- Arvie Graker still in hiding.
This lets you still explore the island and anytime easily carry on the game, viewing what would happen if Mev joined you on the voyage. Taking her with you can let you view a unique scene involving the death of Volcanic Fae and finding two unique items not found anywhere else (the Heart of Stone and her Crown of Wildflowers). If she survives the voyage instead, she’ll turn up again on Roe Island much later, either with a gift or a fight. From a power gaming point of view I feel that killing Mev here and now is the better route, but the specific scene I’m referring to is 100% worth viewing.
The merchant remains uninvited for story reasons. I’ll break the ice here… if you invite the merchant on the ship you can have a few interactions with him, but he’ll die in the town of Set. The alternative would be leaving him behind, so you know he stays alive… but then you're dooming him to remain on a war torn island full of angry druids and cultists. So alive for how long? The only way not to invite him is to avoid talking to him after meeting Ato Triasteen.
The reason we keep CHA at 2 is again for story and quest reasons. I won’t go into details just yet, just remember that the Strange Fruit can be eaten at any time if you want to increase your CHA. I guarantee that they WILL be eaten eventually (before leaving the town of Set).
As for Arvie Graker… his fate will be up to you.
Arvie Bounty: 26-54 gold.
1 random reward - Amethyst (v30), Ruby (v100), Emerald (v90).
The Ruby and Emerald have lower rates then the Amethyst.
and/or...
Killing Mev: 100 exp, 52-106 gold, Black Phosphorus (d8-16) (v300).
Lastly… Mev is also a merchant.
Mev Stock:
- Fine Bronze Cutlass (d3-9) (v30)
- Iron Scythe (d5-12) (v40)
- Antidote (v30)
- Laudanum (v50)
- Crude Lock Pick (v3)
Yes, she’ll sell you an Antidote for cheaper than the merchant. Still not worth it as 2 can be found for free. Laudanum is a drug but will fully heal you and is sought after by a few NPC’s. You shouldn’t have to buy any though.
So… let’s just leave Mev here for the time being, and “deal” with her later.

Finally, time to move on and revisit those chapels. We are going to carry on from the view that you have NOT picked up an Antidote yet.
Chapels (Second Visit)
Make sure you are wearing a Green Cloak.
Third Chapel
To enter this chapel wear a Green Cloak and the Mask of Nierva found from the Druid Assassin. Inside is Poems and Pipe Dreams, Vol. II (v10) and an Antidote (v30). I’m still going to carry on with the guide as though you haven’t picked up an Antidote yet.
First Chapel
Take note that while you can enter with the Green Cloak, after you enter the crypts you’ll need to find and equip a Death Mask as well, otherwise you won’t be able to leave.
By the altar you can find a Heavy Iron Lever (v30). This tool has but one use; to remove the boulder inside the pit at the Triad Apex. Once inside the crypts, we can do some looting.
Plunder the crypts: 33-94 gold, Golden Chalice (v80), Silver Chalice (v40), Golden Bracelet (v50).
1 random drop - 1-3 Emerald (v90), 1-2 Ruby (v100), 1-2 Diamond (v200), Diamond Ring (v150), 2-4 Amethyst (v30).
You’ll always walk away with both chalices and the Golden Bracelet, so the only gamble is the gems. The best drops would be getting 2 Diamond or 3 Emerald.
The Silver Chalice, Golden Chalice and Golden Bracelet can all be sold to the Antiquarian for up to 60/90/130 gold. Diamond can sell for roughly 90-115 gold each (with 8 CHA, depending on the merchant).
Do note that the Golden Bracelet grants 1 protection when worn.
Heading further down we can explore the catacombs.
Open the sarcophagus: When opened a poison dust cloud is released. Holding your breath causes damage unless you have 2 RES. Stepping away also causes damage unless you have 2 AGI to dodge.
Inside there's a Death Mask (a1) (v0). Equipping it is essential.
Explore the dark passage:
A Shadow Lion will attack, you can’t escape. Remember that you can swap out your Green Cloak for better armor if needed, but do it before you choose to fight, as you can’t change gear once combat starts. Defeating it grants 50 exp and also lets us check its previous victims.
Take what you can find: 24-53 gold.
1 random drop - Iron Broadsword (d7-9) (v40), Iron Sabre (d7-9) (v45), Iron Hatchet (d8) (v35), Iron War Axe (d8-9) (v42), Iron Flail (d5-11) (v45), Iron Morning Star (d5-13) (v50), Bronze Mail (a5) (v120), Tarnished Plate Cuirass (a5) (v130), Bronze War Gauntlets (a4) (v72), Bronze Helmet (a4) (v60).
Getting a decent piece of armor will definitely help with the upcoming battles. Aiming for the Tarnished Plate Cuirass or the Bronze Mail (they’re equally good) is ideal if you already have a strong weapon such as the Stone Maul. I’m not saying that the Volcanic Stone Dagger is bad, but it’s not a suitable weapon for an upcoming fight, (Druid War Chief). In this case you may want to take an iron weapon instead, or maybe fight Mev first for her Black Phosphorus.
Everything is now done inside the chapels. We only have 1 last place to visit before we continue with the Antidote quest. (poor Rasleen!)
The Underworld
This is a secret area containing some very lovely loot. As already stated, to access it you need 2 PER to find the pit at the Triad Apex and the Heavy Iron Lever to remove the boulder.
Bring a few Bandages. You’re going to need them!
Gaze into the abyss and make your way to the infernal boundary. The music will tell you that this place is not normal.
As soon as you climb down you’re going to get hurt and take damage. Now you’re trapped down here, stuck in toxic winds. The more RES you have the less damage you’ll take, but we can out heal the damage so don’t be shy about healing or death awaits you. Push forward and find shelter.
Once inside the cavern, light the Torch and some skeletal remains will be found.
Empty the satchel: 6-16 gold, Black Diamond (v300), Clay Tablet (v50).
Take the helmet: Gotterdammerung (a10) (v500).
Congratulations! This is the best helmet in the entire game. The only downside would be that while wearing it you have -1 PER. This may stop you finding some secrets if you stick with a low PER, so consider only wearing it for battle (put it on before you pick a fight option; you can’t change gear once combat starts).
Wait for the storm to subside, and we can now leave this place. Just have to dispatch a weird beastie first. You can randomly escape from the Albino Jackal, but killing it grants 25 exp.
Escaping from the underworld will also reward you with 100 exp and possibly a level up. Raising PER is ideal, as 3 is needed for finding more secrets.
Find the Antidote
I think we have kept Rasleen waiting long enough! It’s finally time to claim an Antidote and save her from the poisoning.
As a quick reminder, a free Antidote can easily be claimed inside the tower house (3 AGI), or the third chapel (Equip a Green Cloak and Mask of Nierva).
Picking one up will grant us 75 exp.
Head back to Pylon, and we can deliver the Antidote to Rasleen.
(This is where the demo will end. If you’ve enjoyed the game thus far and have the means to purchase the rest then please consider it. It goes a long way to supporting indie developers).
What's this!? Rasleen is missing and a druid guardian is in her place. This guardian is the Druid War Chief. It’s optional to approach him, no mask is needed, only a Green Cloak. Needless to say, wearing a Raven Mask is a very bad idea.
Talking to him requires at least 2 CHA, this will let us know that Rasleen has been captured and is now in prison. The prison area near the living quarters is now open to explore.
Let’s take an example look at what our character could currently look like:
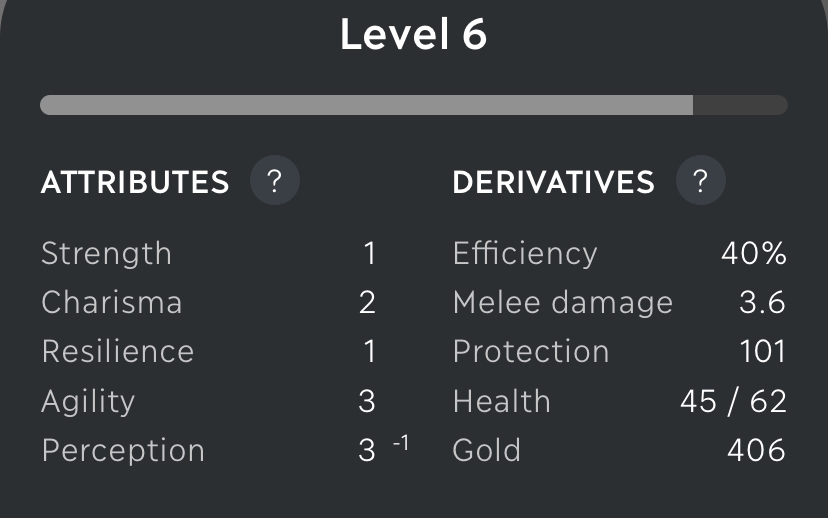
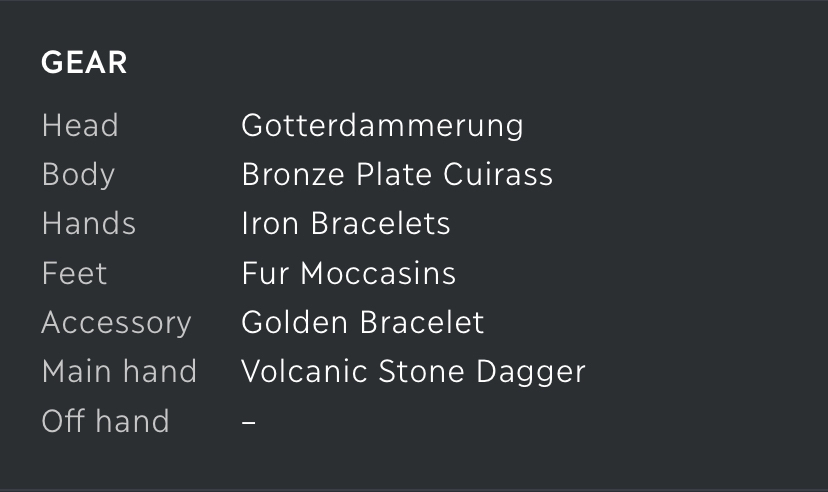
From here on out, raise your stats as you please, but I do recommend working on STR next. Besides hitting harder, every point of STR lets you wear 3 more encumbrance worth of gear.
Druid War Chief Battle
Once again, attacking him is completely optional. Many new players can struggle with this fight. He’s a very difficult opponent. His trident hits hard (10-25), he gets 3 actions a turn, and once he’s built up enough advantage he’ll Sweep you. That leaves you Incapacitated until your next turn: you can’t evade, his next blows deal double damage and your stance is broken. Where you might be level 6 with around 65 health, he’s level 10 with roughly 135 health and 10 armor. Mev is actually the higher level of the two (16, with roughly 240 health), but this guy hits harder.
You can approach him wearing the Green Cloak, then easily swap armor (if desired) after you’ve surprised attacked him (at least 2 AGI, or the attack will fail). With 2 AGI the opening blow deals double your weapon’s damage, with 3 AGI triple. Just make sure you’ve swapped gear before you pick Fight, as you can’t change equipment once combat starts.
His attacks hurt, but armor no longer slows you down, so wear the best you can carry (mind your encumbrance). Every 2 points of protection take 1 off each of his hits. A Defensive stance (1 action, lasts 3 turns) gives you 50% more protection, makes you immune to being Incapacitated, and he won’t try to Sweep you while you’re in it.
If you have the Stone Maul then you should be fine taking him on. It slows you down, but its big hits get through his armor and the Slam attack (250% damage, can’t be blocked or parried) will hit and hurt.
If like in the screenshots you have the Volcanic Stone Dagger then you're going to struggle. It’s light and gives +1 AGI, but with 3-8 damage it barely gets past his armor, which takes 5 off every hit you land.
In this case you’re most likely going to need a weapon that hits harder, such as an Iron Broadsword from the prison (which also lets you Parry), or take on Mev first for her Black Phosphorus, though she’s no pushover either (level 16, roughly 240 health).
Druid War Chief: 75 exp, 11-33 gold.
1 random drop - Iron Mask of Celestial Triad (a6) (v50), Bronze Trident (d5-12) (v40), Rusty Iron Chainmail (a10) (v100) [30% vs 40% vs 30% drop rate].
In my humble opinion, you should aim for the Rusty Iron Chainmail. Yes it’s a full suit of armor taking up the body, feet and hands slots, but it has the highest value and is wearable until late in the game. It’s heavy though (10 encumbrance). You can only wear gear up to your level + 3 × (1 + STR), so wearing it together with the Gotterdammerung (8) and a weapon takes some STR. The mask isn’t needed as we have the Gotterdammerung and there are better weapons than the trident.
The Prison
On the way to the prison, a deserter called Ato Triasteen will stop you. Like you, he wants off this island and will guard the ship while you rescue Rasleen and get a crew.
He’ll now be found on the ship, and you’re able to invite the Merchant, Arvie Graker and Mev onto the ship if desired.
As usual, a Green Cloak is needed and a Raven Mask is a bad idea.
At the prison, two swordsmen are guarding the entrance. If you try to leave you’ll start a fight. Talking to them also triggers a fight unless you have 3 CHA. Talking is simply to get them to leave if taking a non-violent route. You can walk past them for now, but they’ll have to be removed eventually.
A sneak attack will succeed with 3 AGI, removing the first guard and giving 15 exp (but you won’t get his items). You’ll still have to fight the second guard normally. Fighting the first guard will give his items but slightly less exp. Your choice!
Young Guard:10 exp, 3-9 gold.
Old Prison Guard: 20 exp, 3-9 gold.
Do note that most of these guards have the same loot table. We’ll call it Prison Loot.

Now we have 3 locations to check. Rasleen is located in the east wing and all guards will have to be killed or relocated for a successful prison break.
Let’s check the warden's office first.
Wardens Office
Inside the office you can look around and find a Prison Ledger (v10).
Talking to him is not necessary. You need 3 CHA for it, and he only tells you to look in the ledger and gives you a Master Key for the cell doors. These doors can be opened with your Crude Lock Pick (2 AGI). If you sneak up on him (3 AGI) then the Master Key can be pickpocketed from him (or 15 gold if he already gave you a key). Attacking him from this sneak won’t work.
Approaching the Warden after stealing from him makes him confront you.
Prison Warden: 60 exp, 26-92 gold, Master Key (v0) (only if you don’t already have one).
1 random drop - Bronze Broadsword (d6-7) (v26), Emerald (v90), Brown Leather Gambeson (a2) (v50), Iron Broadsword (d7-9) (v40).
East Wing
Unlock the door with the key or pick. After walking to the next cell block, if you have 3 PER then you’ll spot a guard hiding in the shadows, otherwise he’ll surprise you.
As such, if you currently have 3 PER, then wearing the Gotterdammerung gives you the flexibility to lower your PER to trigger this surprise. Why would I want to do this?
If you have 2 PER and walk in without a Green Cloak then the guard will attack you from the shadows. This is a good scene to experience! You can claim an Ancient Iron Dagger (d2-5) (v25) depending on your actions. Note: The counterattack will only work if you have 2 AGI & 2 RES.
3 CHA is needed to convince him to leave otherwise he’ll attack.
Cowled Prison Guard: 25 exp, 3-9 gold, Prison Loot.
You can carry on and find Rasleen, unlocking her door with the key or pick. Giving her the Antidote will reward you with 75 exp.
Talking with her gives you your next step. Stealing the ship and heading to the town of Set for clues on the stingray and the affliction of the mind. You need the prisoners as the crew, but there's still 1 more guard to deal with.
West Wing
Unlock the door with the key or pick. There's a guard in the next cell block. You can quite happily walk past him as long as you're wearing a Green Cloak, and as usual it takes 3 CHA to successfully persuade him to leave.
A nice touch here is that if you killed the guards at the entrance then persuaded this guard to leave, he’ll see the mess at the entrance and be waiting for you.
You can ambush the guard if you have 3 AGI.
Hooded Prison Guard: 25 exp, 3-9 gold, Prison Loot.
Search the end of the corridor (Torch needed) to find an Amphora of Red Wine (v8), Laudanum (v50), 1-3 Red Apple (v1), 1-2 Pear (v1).
We can now report to Rasleen that the guards have been dealt with, however…
Free the Prisoners
If you talk to Rasleen now, the prisoners will be freed, and you won’t be able to go past the living quarters anymore.
So you may want to hold off on that just in case you’ve missed something, especially if you haven’t dealt with the Druid War Chief yet.
My advice: Head back to Mev and make a backup save.
Go back to Mev’s section in the guide, for a reminder if needed.
Don’t fret too much if you’re low on Bandages, the knife thugs in Set always drop them so they’ll be easy to replenish for the trade.
We will be soon taking the ship, so finish up any loose ends, such as Arvie Graker, Mev and the Merchant. As soon as you’re ready, free the prisoners and set sail.
Freeing the prisoners will give 25 exp.
Journey Across the Ocean
“You heard the captain, let's go!" Pale and malnourished, the former prisoners muster all their strength to set the galley in motion. The oars start moving. A unified roar echoes across the Sea of Twilight as the ship departs from the mountainous cove of Port Spire. Ato Triasteen asks: "What's our destination?”
We now have a 3 day journey to the town of Set. 100 exp is gained and you should be level 8 by now. A fully decked out character may look something like this:
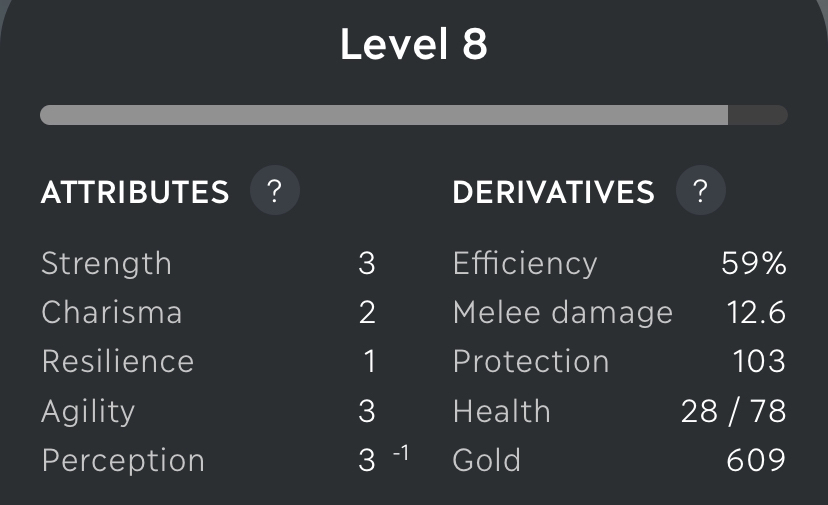
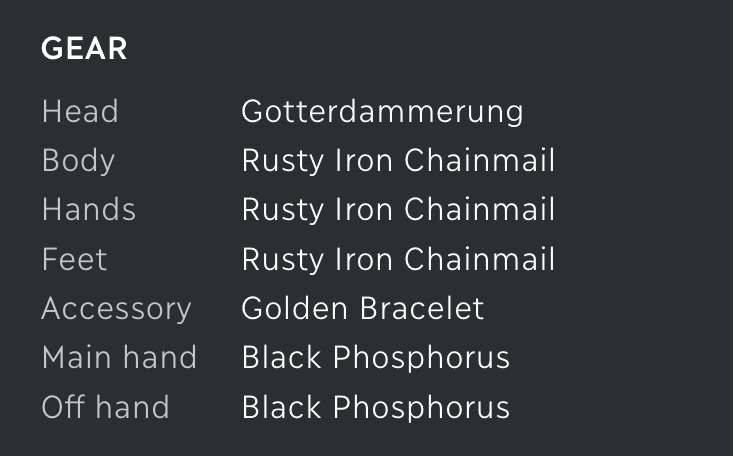
Remember that wearing the Gotterdammerung may prevent you from finding secrets.
Needless to say that completing all the content on the Isle of Dusk can make our character extremely powerful. There shouldn’t be much difficulty with combat for a good while now.
A further 75 exp is gained after talking to Rasleen. Our character will rest and fully heal.
We’ll wake up to find ourselves anchored near a moonlit beach and Ato Triasteen has concerns.
The ship was attacked and we have already lost 3 crew, Cain, Rey and Luther. The crew desperately need supplies and Ato has some suggestions.
If interested then refer to the Prison Ledger as it contains the names of the crew.

Supply choices
There's 5 main choices on gaining supplies for the ship but really it boils down to 2, with “organize a raid,” being far superior to others. I’ll save the best for last and tackle that route after all the other possibilities. Feel free to skip ahead to that section if desired.
We HAVE to gain supplies somehow or it’s gameover. Also note that most of the crew that can die on this journey have no further impact on the game, so don’t worry about that too much. The exceptions are Mastaba and Mev: if they make it through the voyage, you’ll bump into them again later (Mastaba in the Town of Set, Mev on Roe Island).
Going hunting and foraging just gives flavour text and your character won’t gain anything. There will be a few minor interactions on the ship and that’s pretty much it, end of our sailing trip. Needless to say, that first time players taking these routes without checking the others may find this section rather humdrum.
If you skip this first section by saying “it’s too risky,” then some more crew will die and you’ll have some interactions on the ship.
Giving the crew your own supply of food doesn’t affect anything so don’t waste your items.
Giving Rasleen some Laudanum also doesn’t change much, but you’re forced to lend her the Prison Ledger and you won’t get it back. All this will do is let her make a comment later on about some of the crew having good connections. I wonder who she means...
If Mev is with you and sold out Arvie, then she’ll offer to sell him as a food supply. Disgusting!
If the Merchant is with you and you have the Cipher Stone, then he’ll offer to trade with the cathedral on Cape Rem for supplies. He’ll cover the expenses as long as you give him the stone. Totally not worth it!
Letting the Merchant stay in the cabin also affects nothing.
This leaves us with 3 further choices. Either doing nothing and getting a game over or sending some thieves to raid the cathedral… or doing it ourselves.
If you send the thieves you just get flavour text with no benefit to your character, so it’s better to have a crack ourselves.
Raid the Cathedral route
You’ll swim ashore and try to break into the cellar. If you have the Crude Lock Pick then this can be done silently (for no benefit). Otherwise you bash the doors open and have to fight a patrolling knight.
Knight Swordsman: 40 exp, 11-33 gold,
1 random drop - Bronze Claymore (d10-12) (v50), Bronze Plate Cuirass (a6) (v150), Bronze War Gauntlets (a4) (v72), Winged Bronze Helmet (a4) (v50), Bronze Plate Greaves (a5) (v85).
You can head downstairs and steal some supplies. With 2 PER you can even find a hidden compartment.
Cellar Stash: Laudanum (v50),
1 random drop - 4-6 Amethyst (v30), 2-3 Ruby (v100), 2-3 Diamond (v200).
Note that the Amethyst, Ruby and Diamond have lower drop rates, (60%/30%/10%).
When we leave, having 3 AGI means we can flee without issue, but with only 1 or 2 AGI we are too slow and another knight blocks our escape, forcing a fight.
It’s unlikely this encounter will often get seen due to the previous 3 AGI requirement for the tower house.
Knight: 40 exp, 11-33 gold,
1 random drop - Bronze Claymore (d10-12) (v50), Bronze Plate Cuirass (a6) (v150), Bronze War Gauntlets (a4) (v72), Winged Bronze Helmet (a4) (v50), Bronze Plate Greaves (a5) (v85).
Yup, the same drops as the last knight.
Well that's it with this route, you then progress to the town of Set. So let's backtrack and see why the first raid option is the better route.
Raid the Manor - Mastaba route
Firstly let’s just say that this route is greatly changed depending on if Mev is on the ship or not.
As such, I’ll do a seperate section just for the Mev choices.
Without her you’ll be raiding the manor with the prisoner Mastaba and Ato as ranged support.
We first come across a knight guardsman whom Ato manages to wound with an arrow. He can then be left to Mastaba to finish off but you won’t gain anything unless you kill him yourself.
Knight: 40 exp, 11-33 gold,
1 random drop - Bronze Claymore (d10-12) (v50), Bronze Plate Cuirass (a6) (v150), Bronze War Gauntlets (a4) (v72), Winged Bronze Helmet (a4) (v50), Bronze Plate Greaves (a5) (v85).
These are the same drops as the knights from the cathedral route.
After plundering the manor house you gain 2 Bag of Loot (v50). These are opened on the ship for some random item drops. We are then left with an ethical choice of either killing the witnesses or letting them live.
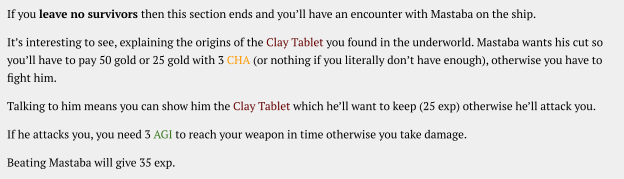 If you leave the innocents alive then a knight on horseback will chase you, killing Mastaba and losing 1 Bag of Loot as he was carrying it.
You get to instruct Ato where to shoot the knight, aiming for the horse being the better option as he’ll miss the head shot. The knight can give you a game over if you fail your actions or you try to escape so aim for the horse or stand your ground.
“Dodge and counter” requires 3 AGI and “dismount the rider” requires a Bronze Halberd, Fine Bronze Halberd, Rusty Iron Halberd or Bronze Javelin to be equipped (only the bronze halberds will pierce his armor). Once off the horse, we can fight him.
Vengeful Knight: 40 exp, 13-36 gold,
1 random drop - Bronze Plate Cuirass (a6) (v150), Bronze Plate Greaves (a5) (v85), Bronze War Gauntlets (a4) (v72), Heavy Bronze Broadsword (d6-9) (v40), Blue Kite Shield (b22%) (v40).
Regardless of the choice you made, we get to open the Bag of Loot with the crew and divide the spoils. Just remember this may be just 1 bag or 2 bags. I’ll cover what's in the bags after detailing the Mev route.
Raid the Manor - Mev route
If you invited Mev onto the ship then she joins you on this raid. While killing her back in the Tavern on the Isle of Dusk is better overall, viewing this raid is definitely worth it as some unique scenes are witnessed.
The same knight guardsman as in the Mastaba route tries to stop you, but this time the bloodthirsty Mev kills him, not giving you a chance to fight and depriving you of exp, but you can still loot his corpse.
Check the corpse: 11-33 gold,
1 random drop - Bronze Claymore (d10-12) (v50), Bronze Plate Cuirass (a6) (v150), Bronze War Gauntlets (a4) (v72), Winged Bronze Helmet (a4) (v50), Bronze Plate Greaves (a5) (v85).
You raid the manor and gain 2 Bag of Loot (v50) as normal, but this time Mev is going to personally kill the innocents. You can turn a blind eye or try to convince her to stop (3 CHA).
You get a rather graphic description of what happens if you fail to convince her. This also lets you attack her, giving the same drops as back in the Tavern (100 exp, 52-106 gold, Black Phosphorus).
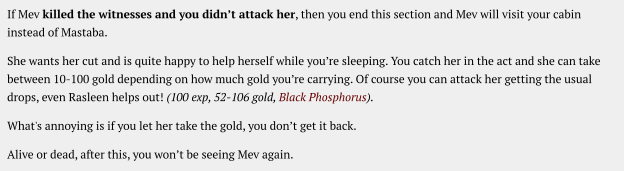
Now let’s get to the real juicy part!
Managing to convince Mev to spare the innocents means the knight on horseback will attack her… and impale her on a tree! Of course you lose 1 Bag of Loot in the process. This throws the knight from the horse and you get to fight him without worry.
Vengeful Knight: 40 exp, 13-36 gold,
1 random drop - Bronze Plate Cuirass (a6) (v150), Bronze Plate Greaves (a5) (v85), Bronze War Gauntlets (a4) (v72), Heavy Bronze Broadsword (d6-9) (v40), Blue Kite Shield (b22%) (v40).
Now you have a choice. You can leave Mev to rot or watch her burn, either way she's finished. It’s a very satisfying scene to watch and she leaves behind a unique item, the Heart of Stone (v125) (approach her and ask how you can help to watch her burn; walk away and you won’t get it). It’s an accessory that gives +2 RES and the Antiquarian will look at it but not buy. The next morning Mastaba will ask where Mev is. Tell him she’s dead and he’ll hand you her Crown of Wildflowers (+1 protection, +7.5% melee evade).

Like with the Mastaba route, regardless of the choice you made, we get to open the Bag of Loot with the crew and divide the spoils. Either 1 bag or 2.
Bag of Loot
The reason this has its own section is because there's a lot of different drops from these bags.
Also, having 1 Bag of Loot vs 2 Bag of Loot means different loot tables. One might think that the drops would be doubled but this isn’t the case.
There are 3 main items we want from these bags; the Black Dress Shoes, Red Evening Gown and Fraternal Headpiece. All three give +1 CHA when worn (the shoes and gown also give -1 AGI). Very useful to quickly equip when wanting to barter with merchants.
The benefit of 2 Bag of Loot not only means more loot, but smaller individual tables so it’s easier to find these items… BUT we have let innocent lives die and can’t fight the Vengeful Knight.
The Black Dress Shoes and Red Evening Gown can still be gained from 1 Bag of Loot, but it may take a bit of save scumming. Goodluck!
1 Bag of Loot: 3-23 gold, 8-16 Loaf of Bread (v1), 6-10 Jug of Water (v1), Jade Idol (v60).
1 random drop - Black Dress Shoes (a1) (v10) [+1 CHA -1 AGI], Ceremonial Sash (v12), 1-2 Gold Ring (v25), Framed Portrait (v80), Ruby Bracelet (v75), Silver Ring (v22).
1 random drop - Fraternal Headpiece (a1) (v8) [+1 CHA], Red Evening Gown (a1) (v35) [+1 CHA -1 AGI], Expensive Fur Coat (a1) (v80), Gold Necklace (v30), Gold Ring (v25).
1 random drop - Commemorative Plate (v6), 1-3 Silver Candlestick (v8), 1-2 Golden Candlestick (v16).
1 random drop - 1-3 Block of Cheese (v3), 1-2 Blue Cheese (v4), [80% vs 20% drop rate].
Otherwise...
2 Bag of Loot: 16-48 gold, 3-6 Silver Candlestick (v8), 2-6 Block of Cheese (v3), 12-26 Loaf of Bread (v1), 8-14 Jug of Water (v1), 0-4 Blue Cheese (v4), Jade Idol (v60).
1 random drop - Black Dress Shoes (a1) (v10) [+1 CHA -1 AGI], Ceremonial Sash (v12) [40% vs 60% drop rate].
1 random drop - Red Evening Gown (a1) (v35) [+1 CHA -1 AGI], Fraternal Headpiece (a1) (v8) [+1 CHA], Expensive Fur Coat (a1) (v80) [20% vs 40% vs 40% drop rate].
1 random drop - 1-3 Golden Candlestick (v16), Framed Portrait (v80), 2-4 Amethyst (v30), Commemorative Plate (v6).
1 random drop - Silver Necklace (v45), Gold Necklace (v30), Gold Ring (v25), Silver Ring (v22), Ruby Bracelet (v75).
Note: The Ceremonial Sash, Commemorative Plate, Framed Portrait and Fraternal Headpiece can all be shown the Antiquarian but he won’t buy them. You’ll always get a Jade Idol, which can be sold to the Antiquarian for 60 gold.
The Ceremonial Sash gives 1 protection and the Ruby Bracelet gives 2. The bracelet goes in the ornament slot (like the Golden Bracelet) and the sash in the accessory slot, so you can wear both.
Hopefully you’ve spent the time to get the Black Dress Shoes, Red Evening Gown and Fraternal Headpiece. Right now we can easily boost our CHA from 2 to 7! But don’t eat those Strange Fruit just yet… soon, but not yet.
The crew are looking to be fed, so we have to hand out 5 loaves of bread. They aren’t satisfied with just that though and demand more. You can be kind and hand out more bread, cheese and water, but this isn’t needed. With 3 CHA you can convince them to ration or simply make an example and beat up a Starving Pirate for an easy 5 exp.
End of Voyage
Phew! What a section of the game. It’s either very short or an exciting roller coaster that tests your moral compass.
This is one of the reasons why a backup save file on the Isle of Dusk is a good idea. You’ve already done all the grunt work, so you can easily check this entire section at your leisure.
There's more flavour text from Ato, Rasleen and maybe the Merchant depending on your route of choice, these are explained a bit back in the supply choices chapter.
The voyage will soon end and we’ll find ourselves approaching the Town of Set without further incident.
The Town of Set
"It's past midnight. A quiet shantytown lies outstretched on the northern coast of Roe Island. The drum quiets down as the rowers make their final effort. You have reached the Harbor of Set."
Welcome to the town of Set on the Isle of Roe. The druids have remained on the ship and the rest of the crew have all dispersed. This town has a number of problems to deal with, and it turns out we were being controlled this entire time!?
Inside the Tavern we have some thugs to deal with. With 3 CHA we can negotiate and intimidate them (or bribe for 25 gold). They killed some of our crew so I say slay the bastards.
Defensive posture means you only take on 2 thugs leaving Rasleen to fight the third. No holds barred lets you take on all 3.
A lot of the bandits we’ll be fighting in Set have the exact same loot tables (namely thugs and hoodlums). So I’ll refer to their drops as Thug Loot and Hoodlum Loot.


Knife Thug: 25 exp, 3-9 gold, Thug Loot.
Crazed Hoodlum: 25 exp, 3-9 gold, Hoodlum Loot.
Ruthless Knife Thug: 25 exp, 3-9 gold, Thug Loot.
Note that later on, each Tusk Medallion can be given to Hadrian Trout for a 25 gold bounty.
With a full suit of armor (around 20 protection) these bandits can hardly damage you, as half your protection is taken off every hit, so the knife thugs only scratch you for a point or two. You’ll rest and recover, Rasleen will stay behind and guard the tavern. The local militia are on the brink of war with the nomads so that's the best place for her at the moment. In the meantime the town has developed a bandit problem.
There’s a few different places we can check out.
Wolf Shrine
We can’t do much at this location just yet. Hadrian Trout can be found here after we rescue him, otherwise we can either leave town to unlock the northern plains, or head to the infirmary.
Infirmary
Here we’ll find a very busy monk, tending to the wounded. You can buy Bandages from him but they are pricey (he has a very high CHA score).
You can speak to him about the affliction of the mind for 50 exp. The monk will advise you to seek help from the druid hermits that live on Graefir Island. The ship is in no position to take you there without a crew so we’ll need to seek out Calvino the Boatman.
We can take a shortcut back to the harbor from here, but a thug has to be dealt with first.
When faced with this thug, we have a few choices. Running away sometimes works but can randomly fail, then you’re forced to fight. The more AGI you have compared to the bandit, the easier it is to escape (with the same AGI as him it’s a 50% chance). You can charge at him and you’ll both lose health but ambush is the better option, needing 3 AGI to be successful. (If equipped with a bow you can also shoot him for damage, but we haven’t picked one up yet. Ambush is still the better option).
Pale Knife Thug: 30 exp, 3-9 gold, Thug Loot.
Now we can safely use this shortcut as often as we like.
Harbor of Set
We’ve ended up back at the harbor but we have some options now. You can head back inside the tavern to rest up and talk to Rasleen.
The ship we arrived on can be boarded again. Talk to Ato Triasteen and he’ll hand over a Hunting Bow (d6-14) (v18) as well as 3 Arrow (v4).
The Hunting Bow mechanic is a bit strange. It can be equipped in the off hand slot but it isn’t used for main combat. Certain areas will let you shoot an enemy either doing damage or outright killing them and giving exp, (as long as you have an Arrow, 1 is used each shot).
This of course can be an issue if you're using 2 handed weapons or a shield, so most likely you’ll equip the bow just for a specific shot, then unequip it again before you choose to fight (bows can’t be used once a fight has started anyway).
More Arrow can be brought from Ato. You’ll want some eventually but if wanting to buy now then remember to equip your Black Dress Shoes and Red Evening Gown, for a significant discount. (2 CHA = 7 gold / 3 CHA = 6 gold / 4 CHA = 4 gold / 5 CHA = 4 gold / 6 CHA = 3 gold).
Ato Stock:
- Arrow (v4)
- Domed Shield of Dusk (b16%) (v14)
- Domed Shield of Rook (b16%) (v14)
Talking with Ato and the locals will update your quest log . We need to head back to the marketplace so we can access the guard tower.
Guard Tower
We can choose to leave town from this area, which will unlock the abandoned farm on the map.
If we climb the tower we can gaze across Set and see that shady characters are lurking around. Equip the Hunting Bow and we’ll unlock a new option to use the bow from the tower.
Target both areas (2 Arrow needed) and we’ll flush out a couple of bandits for 10 exp and the ability to fight them in those areas.
Leave town and head to the abandoned farm for the first encounter. No need to retreat. You can also use your bow here to damage him before the fight but you won’t get any extra exp. Don’t bother wasting the Arrow, the fight will be easy anyway.
Vicious Knife Thug: 30 exp, 3-9 gold, Thug Loot.
Head towards the marketplace and the other bandit will be looking for a fight. Same deal, don’t bother shooting him again.
Wounded Bandit: 30 exp, 3-9 gold, Thug Loot.
Lastly, we can go check out the longhouse.
The Longhouse
Not too much to do here at the moment. Talk to people to try and get some information. One of the pirates will give you a Moonshine (v10). These can also be brought from the owner.
If Mastaba made it to Set alive (he guards the ship if Mev came on the manor raid; on the Mastaba route he has to survive the raid and you can’t come to blows with him over his cut), you’ll run into him the first time you leave the longhouse. A few drunken thugs are beating him up in a back alley. With 3 CHA you can tell them to leave him alone for 10 exp, or fight one of them instead.
Thug: 10 exp.
Either way, the barbarian mumbles his thanks and staggers off for another drink. You can also just walk away, it’s none of your business.
Take note however, that after visiting the longhouse, while traveling back to the marketplace you’ll come across the dead body of the Merchant (if he joined you on the ship). Perhaps one way to keep him alive (story wise) would be not visit the longhouse until you have rescued Hadrian Trout. Maybe he still dies and you just aren’t around? Who knows, I’ll leave that up to you. Either way, you can inform Arturo inside the longhouse about his death, if you wish.
You can also tell Rasleen about the merchant's death, but she’ll remain indifferent.
Den of Thieves
To access the den of thieves, we first have to head to the northern plains via the wolf shrine.
Approach the log cabin to the east. When inside, with 3 PER you’ll find a floor hatch leading to the secret guild.
Everytime we want to visit this place, we’ll have to pay the guard 5 gold, so if you want to do business later then feel free, (after eating the Strange Fruit).
There’s a couple of important items that can be brought here, so let's look at the stock.
Smuggler Stock:
- Rondel Dagger (d5-10) (v25)
- Stiletto (d4-11) (v27)
- Exotic Perfume (v200)
- Advanced Lock Pick (v150)
- Crude Lock Pick (v3)
Hostess Stock:
- Moonshine (v10)
- Panossian Red Wine (v30)
- Phenrisian Cider (v10)
- Laudanum (v50)
The Advanced Lock Pick is needed to open the Tomb of Hieronymus on Graefir Island, pricey but worth it!
The Exotic Perfume is a consumable that permanently gives you +1 CHA, just like the Strange Fruit. Here’s the deal though, the Tomb of Hieronymus contains 2 unique items that also boost your CHA. Ideally we can have +4 CHA from simply wearing the correct equipment, combined with our natural 2 CHA and 2 CHA from eating Strange Fruit… we can easily have a total of 8 CHA which gives us the max discount.
As such, one doesn’t actually have to buy any Exotic Perfume, and they can save all their funds for the PER boosting Sacred Elixir.
This does mean however, that you will have to keep changing equipment when needing that CHA boost. Maybe a slight annoyance. We can also get more income when selling items if we go past 8 CHA, but would that cover the cost of buying? Doubtful, but I don’t care to check the exact numbers (yet).
Regardless, we will soon be at the section where having 2 CHA or 3 CHA will greatly affect the fate of the nomads and the town of Set. I know those Strange Fruit are looking mighty tasty, but hold off for just a little bit longer!
The next part we’ll want to check in this area is the lake to the south, along the way we’ll meet a lone fisherman.
Northern Plains Fisherman
When heading to the lake from the northern plains, a fisherman will stop us with a warning of the bandits ahead.
You can actually attack him if you wish. You won’t get caught, so it’s your moral choice.
Lone Fisherman: 5 exp, 1 gold, Silver Pendant (v35).
The liar! He said that the bandits took everything. Maybe he’s secretly a cartel spy, who knows!? (That’s my reasoning for claiming that 5 exp from an innocent fisherman).
The Silver Pendant gives 1 protection.
If we head to Lake Roe then it takes us down the path of tackling the bandits ourselves. We don’t want to make that choice just yet, we still have the other side to explore, so head back to Set and towards the abandoned farm.
After the farm we journey past the grasslands of Roe and arrive at the militia camp.
Militia Camp
At the militia camp, they’ll brief you on the situation with the nomads. The militia are much more concerned with the nomad exiles than the bandit problem back in Set. We can offer to speak to the nomads for a resolution.
This is where having only 2 CHA or 3 CHA will matter when negotiating peace.
Heading to the nomads we’ll come across a nomad sentry.
We can kill him for 30 exp and no consequences, otherwise you’ll need 3 CHA to convince him to let you past peacefully, which is worth 10 exp.
(Can also be shot with the bow for slight damage but no exp).
Nomad Camp
Talk to the nurse and she’ll tell you of their plight. She sells Miracle Cure (v10) but only buy this if you want to see a unique death scene, drink some when very low on health.
The wounded nomads are in dire need of Bandages. Giving 1 gets you an Amethyst, 2 gets nothing but 3 gets you a Dread Root (v250). Eat this right away for a permanent +1 AGI. Awesome!
The village elder has a lot to talk about and now we'll be coming to crunch time. The fate of the entire nomad tribe rests in your hands.
You have 3 main choices:
- Attack the bandits yourself, not worrying about what happens to the nomad/militia situation.
- With 3 CHA, talk to the village elder, the militia and Rasleen and negotiate a peace. The nomads will attack and clear out the bandits, then peace will form between the 2 sides.
- With 1 or 2 CHA, the negotiations will fail. The nomads will attack the militia, wiping out both sides, leaving only 1 militia captain alive.
So what route do you take? Well if you care for Rasleen and her people then doing the peaceful route will net you the most exp.
Failing the negotiations means you still have to attack the bandits yourself. You’ll get less exp but more gold as well as some unique equipment.
So the choice is yours! Eat those Strange Fruit either now or later. The only reason one would want to keep 2 CHA beyond this choice, is to fight Ato Triasteen when leaving Set for good. Not really worth it, but some may want to view the scene once.
Save the nomads route
So you’ve chosen to save them from destruction? Good on you! That will make Rasleen very happy indeed! (Plus the devs, canon route maybe?).
After talking to the tribal elder, you can head straight back to the tavern to get Rasleen’s advice. Head back to the militia and inform them of Rasleen’s proposal (needing at least 2 CHA or you’ll fail here). Passing the first CHA check, they will be agreeable. Inform to the tribal elder, but he’ll want guarantees on the tribes safety. This is given if you have 3 CHA, otherwise negotiations will fail. Back once again to the village elder.
Happy with the vow of honor, the tribe wastes no time and attacks the bandits, giving you a massive 250 exp!
Following the tracks unlocks a shortcut to the bandit camp. An injured bandit is fleeing from the scene and you have a chance to intercept him. Equip your bow and shoot him to not only do some damage, but to also gain 5 exp. Unequip again if using a 2handed weapon.
You can charge at him to finish him off, but stepping aside gives you the chance to ambush him (3 AGI) for 10 exp, and finish him off for another 10 exp. Then you can rifle through his pockets to still get the gold and Tusk Medallion.
Injured Bandit: 15 exp, 1-8 gold, Tusk Medallion.
The main fight is over as quickly as it began. If you accept the reward you’ll gain 50 gold, otherwise refusing it grants 20 exp.
After this you can check the bandit camp and free the prisoners for 25 exp. Chief Hadrian Trout and Calvino the Boatman will now head back to Set and the nomads will take up residence at the tavern where Rasleen is.
One slight downside will be that the tavern will now be too full so you can no longer rest to recover your health. This route will also grant another 20 exp later on after you inform the nomads of Rasleens fate.
Doom the nomads route
If you don’t want the nomads to die, but still want to attack the bandits yourself, then skip the negotiations and attack the bandits first. You’ll miss out on 30 exp and some unique equipment but the conflict will remain unresolved, though it’s pretty much a given that it will end in bloodshed.
This route is why we kept our CHA at 2 on the backup save. Follow the same steps of negotiations as above, but the vow of honor won’t be made. Informing the village elder of what the militia field commander said, the nomads will then attack the militia, wiping out both sides apart from 1 survivor, the field commander.
You can talk to him peacefully, but if you keep walking towards him, you’ll fight and can claim 30 exp but no item drops. If you really wanna be a git, you can also shoot him with the bow.
Plunder the camp: 7-26 gold.
1 random drop - Iron Battle Axe (d9-13) (v55), Iron Helmet (a4) (v70), Black Iron Gauntlets (a5) (v50), Black Iron Shield (b20%) (v50).
The Black Iron Gauntlets are special as they give +2 melee damage.
The Black Iron Shield is also very special as it gives a bonus 5 protection and +1 RES!
You can inform Rasleen about what happened, naturally she doesn’t take the news well.
Head back over to Lake Roe to deal with the bandits.
Once at the lake, you can use your bow at the bridge and run away many times if you feel like wasting arrows. Charging at the bridge starts a long fight with many bandits. Hiding among the reeds lets you shoot your bow for bonus exp, and/or swim across the river (3 AGI) to sneak into the camp. Either 1 or 2 AGI gets you different unique death scenes.
The most items and exp comes from directly attacking the bridge. You can still shoot your bow from reeds twice for 20 exp then attack the bridge right after, with no loss of fights.
If you sneak into the camp, you’ll get advice from a nameless ex-crew mate from the ship. You get different options on how to kill the bandit war lord, but they are all subpar to attacking the bridge directly, so feel free to explore these options at your leisure.
Remember that in between each fight here, you can heal, save, and stack your advantage points. The bandit war lord can also be shot with your bow before the fight, but it doesn’t do much.
One-eyed Knife Thug: 20 exp, 1-8 gold, Tusk Medallion.
Merciless Knife Thug: 20 exp, 1-8 gold, Tusk Medallion.
Swift Knife Thug: 20 exp, 1-8 gold, Tusk Medallion.
Brutish Knife Thug: 20 exp, 1-8 gold, Tusk Medallion.
Scarred Knife Thug: 20 exp, 1-8 gold, Tusk Medallion.
Bandit War Lord: 50 exp, 12-24 gold, Tusk Medallion.
0-2 random drops - Bone Crown (v75), Bone Shield (b20%) (v50). [50% chance each at dropping].
The Bone Crown is an accessory that gives 2 protection. The Bone Shield gives 5 protection.
Concubine: 25 exp, 1-8 gold, Tusk Medallion.
Well done, the war lord can be quite tough for the unprepared. Note that the Bone Crown can be shown to the Antiquarian but he won’t buy it. Explore the camp and free the prisoners for 25 exp. Chief Hadrian Trout and Calvino the Boatman will head back to Set.
Set Liberated
WIth the bandits dealt with and the mayor back in office, the townsfolk feel safe to walk the streets again. Any bandits that you didn’t attack previously have now disappeared as law and order returns to Set.
At the wolf shrine you can now talk to Chief Hadrian Trout. He’ll give you Report One: The Tusk Mob (v1) and Report Two: The Khiris Cartel (v1). These can be shown to Rasleen for 100 exp and will give you hints about the whereabouts of Mantis, enabling you to travel to Bast Island via Calvino the Boatman. You head to Bast Island until you visit Graefir Island first however, to try and remove the affliction of the mind.
Hadrian Trout will also exchange any Tusk Medallion for 25 gold each, and give you a quest of locating Arturo the Guardsman.
The Marketplace
The market is now open, with many different traders. Feel free to save any major trading until after Graefir Island, once you’ve raided the Tomb of Hieronymus. The only item you’ll definitely want to buy right away is a Rope.
Ultimately, 2 Rope will be needed for quests.
A Shovel and Torch are also needed but we already have those.
Note that the fisherman and junkman have the lowest merchant CHA scores in the game. As such, they are the best to sell items to. Infact, their CHA is so low, that you won’t see any benefit from increasing your CHA past 4 with them.
The fisherman:
- Crone River Eel (v8)
Note that these eel are good for healing when you’re in a pinch, 1 use for 25 health.
The blacksmith:
- Heavy Iron Mace (d3-20) (v50)
- Iron Pike (d3-20) (v30)
- Iron War Sickle (d10) (v50)
- Heavy Iron Chainmail (a9) (v150)
- Heavy Iron Greaves (a6) (v100)
- Heavy Iron War Gauntlets (a6) (v100)
Honestly, your equipment is fine. Beating the Ironclad Vagrant will most likely take a playthrough aimed at it from the start, as some of the gear for it can only be found early in the game. See the separate Ironclad Vagrant guide if that’s your goal.
The tailor:
- Black Beret (a1) (v15)
- Black Cape (a1) (v12)
- Black Tunic (a1) (v10)
- Red Cape (a1) (v12)
- Red Tunic (a1) (v10)
- White Cape (a1) (v12)
- White Silk Gloves (a1) (v15)
- White Silk Scarf (a1) (v25)
- White Tunic (a1) (v10)
- Wool Cap (a1) (v8)
Nothing here is needed, unless you're into roleplaying an outfit.
The junkman:
- Iron Butcher Knife (d6) (v22)
- Spiked Gauntlets (a5) (v150)
- Tattered Fur Mantle (a1) (v8)
The Spiked Gauntlets only add 1 melee damage now, so they’re hardly worth 150 gold (the Black Iron Gauntlets from the militia camp do more). You won’t be able to wear them with the Rusty Iron Chainmail set either, so you’d need a Bronze Plate Cuirass and some Heavy Iron Greaves to go with them, and definitely some more STR to carry it all. You can just as easily carry on with your current equipment.
The carpenter:
- Arrow (v4)
- Rope (v15)
- Shovel (v10)
- Torch (v2)
- Wolf Idol (v3)
2 Rope will be needed, 1 to rescue someone stuck in a pit trap on Graefir Island and another to tie up Arturo the Guardsman. Also buy a Wolf Idol as 1 can be sold to the Antiquarian later on.
Arrest Arturo the Guardsman
To find where Arturo is hiding, we have to head to the longhouse. No one is willing to talk, but as you're leaving, an ex-crew mate stops you, wanting to repay his debt. He informs you that Arturo is hiding at the abandoned farm outside of town, and not to underestimate him. Deal with him before heading to the Isle of Bast, as he’s gone from the farm after that.
He’s a tough nut: lots of health and 25 armor, so bring your hardest-hitting weapon. He can Parry, which Slam and Swipe ignore, and Puncture chips away at his armor.
Make sure you have a backup save before doing this encounter. You’ll need any Lock Pick, a Rope and at least 3 CHA for the ideal outcome. Not only can you be instantly killed, but there's a slightly tricky path when dealing with Arturo, if wanting to discover a hidden loot stash.
When exploring the old farm, if you try the front door then you die. If you leave the old farm when at the front you’ll also die unless you have 3 RES, in which case the Arturo encounter starts. Look for another entrance and we can open the door with any Lock Pick.
Note that you can leave the old farm via this entrance and come back later, as long as you haven’t gone inside. Once you’ve met Arturo, walking away means he’ll flee and you’ll never find him. If you go back to the front entrance then you're a dead man without 3 RES. You can kick the door in with 3 STR but that will alert Arturo and you’ll be shot. If you use a Lock Pick you’ll have the drop on him so you can shoot him with a bow or sneak attack him with 3 AGI, but you won’t find the stash.
As this encounter has tricky pathing, I’ll detail the ideal route to take.
Saying the wrong thing at the wrong time, or wrong action means he won’t spill the beans about the secret stash.
Basically, you have to talk to him first and bribe him to learn about the Tusk Mob, then fight him (he won’t die), so when the pressure is on, that's his last secret to turn to.
The ideal Arturo route is as follows:
- Explore the old farm.
- Look for another entrance.
- Open the door.
- Disable the lock. (Any Lock Pick needed)
- Go inside.
- Talk to him.
- “I’m looking for Arturo the Guardsman.”
- “I need information about the Tusk Mob.”
- “I promise to let you go.” (3 CHA)
- Pay him. (-100 gold)
- “What do you know about Mantis the Crime Lord?”
- Fight him. [Gain 50 exp, 5-15 gold, Iron Claymore (d11-14) (v60), Laudanum (v50).]
- Hear him out.
Don’t skip step 11. The “Fight him” you’re offered straight away stops when he’s down to his last hit point, and you get no exp or loot from it.
From here, what happens to him is up to you. You can reclaim the 100 gold, then either kill him, leave him alone or use the Rope and take him to Hadrian Trout for a reward of 150 gold.
You only get a 25 gold reward if you kill him.
There isn’t much left to do in Set. Visit Rasleen in the tavern if you haven’t already. Enjoy the touching reunion if you saved the Nomads then when ready, talk to Calvino the Boatman at the harbour about traveling to Graefir Island.
Graefir Island
Emerging from the mist, the nomad walks down the harbor from the marketplace, brandishing a newly purchased spear. Climbing aboard the raft, Rasleen mutters: “Hope this isn't a waste of time…”
Calinvo the Boatman requires 5 gold to take you to Graefir Island. We’ll be bringing Rasleen with us this time, so you’ll need to grab her from the tavern.
You’ll also be needing the Cipher Stone, a Rope, an Advanced Lock Pick and a Torch.
Follow the set path and 50 exp will be gained. Pick whichever options you like and progress through the story, you can’t mess up here. You’ll have to kill a stingray in your visions for another 50 exp. 100 exp will be earned after the visions and all your health will be restored.
After leaving the Ephemeral Lodge, you can go back inside and talk to Sage Ephemeron and the guard once more to be given A History of Graefir Island (v35). The guard also sells a few items.
Ephemeral Guard Stock:
- Arrow (v4)
- Longbow (d12-22) (v100)
- War Staff (d6-12) (v25)
The Longbow can replace your Hunting Bow letting you do more damage when using a bow out of combat. This isn’t really needed as we generally only want to use the bow in certain sections for bonus exp. This is the only place where you can buy a Longbow however, so some may want it for completionists sake. Your choice!
Tomb of Hieronymus
Explore the garden and examine the stone monolith, using the Cipher Stone to translate. This lets you travel north and you’ll come across a pit with a person trapped inside.
Use a Rope for 25 exp, then question the man and make sure to stop him, getting the truth from him. You’ll get a Map of Graefir Island (v50) and this lets you search for the Tomb of Hieronymus. Don’t turn back, push forward and clear the undergrowth for 25 exp.
Once you’ve found the tomb, the Advanced Lock Pick will let you unlock the door, then having a Torch lets you explore inside.
Remove the lid of the sarcophagus and there will be 3 treasures waiting for you to claim them.
The Crimson Falcata (d7-14) (v150) is a single handed sword that also makes you 15% faster in combat. It can be held in either hand.
The Jeweled Circlet (v500) is a treasure that is worn on the head, granting +1 CHA.
The Orb of Reflection (v50) is a treasure that is held in the off hand, also granting +1 CHA, and it doubles your initiative so you’ll act sooner at the start of a fight.
The Crimson Falcata can be shown to the Antiquarian but he won’t buy it. He’ll buy the Orb of Reflection for up to 50 gold, but why sell something so useful?
Awesome stuff. We now have 4 different CHA boosting items, so equip them when needed and trade to your heart's content!
There's nothing else left for us on this island, so now we can leave and prepare for the next area.
The Isle of Bast
“You hear a familiar voice as soon you step outside: “I heard you were looking for me…” Accompanied by two bodyguards, the man standing in front of you is none other than Mantis the Crime Lord. Dressed in his black cloak, he grins below the wide brim of his slouch hat. “… so here I am.”
Once again, Calinvo the Boatman will ferry us, but will require 8 gold for the Isle of Bast. Now that we’ve hopefully combated the affliction of the mind, we can travel here. You need to show Rasleen the reports given by Hadrian Trout to travel.
For this area you’ll want to bring with you any bow with at least 5 Arrow and a Shovel. If you’ve built your playthrough around taking on a certain armored opponent, bring the gear from the Ironclad Vagrant guide too. Healing items are also important.
Talk to Rasleen about the Isle of Bast for 10 exp and meet her at Calvino’s. You’ll get another 10 exp for arriving at Bast.
Follow the story and when leaving the tower we’ll come face to face with Mantis and his bodyguards. For the most experience, use your bow only once for 10 exp, then charge and attack the Cartel Bodyguard for 20 exp.
This is where our comrade in arms, the beloved Rasleen will die. On a normal playthrough there's not a damn thing we can do about it. Go on, get your anger out now, I’ll wait. (Completionists: there IS a way, but only once you've unlocked every single achievement. See Saving Rasleen below.)
After our near death experience, we’ll be barely alive at 1 health. This is a perfect time to eat some of those weird, harmful plants!
But in seriousness, it’s the perfect time for healing items, or head back to Set and rest in the Tavern. Some Palefoot Mushroom are just around the corner.
If the nomads are alive you’ll get 20 exp for informing them of Rasleen’s death and they’ll make space for you to rest.
If carrying a Shovel we can bury Rasleen on Bast, not only for 20 exp, but because it’s the right thing to do.
Well… personally I would have taken her body back to Set so she could have been buried with her people that were lost in the bandit fights. Maybe in a future update? *hint hint* (Well, the devs did listen, sort of. See Saving Rasleen below.)
Saving Rasleen (Secret)
This one is for the completionists. If you’ve unlocked every single achievement (all 15, from any of your playthroughs; one of them even needs you to bury Rasleen, so this is for a later run), the fight with Mantis plays out differently. Deal with the bodyguards, attack him, ignore his command and Snap out of it. This time you break free and get a choice:
- Let her die: everything plays out as described above.
- Save her life: you tackle her out of the way and take the blade instead. You’ll pass out and find yourself in a corridor of flame. Follow the conversation to What about my friend?, then Plead for mercy. (Accept her fate sends her into the fire, and you wake up by the stone tower with her body as usual.)
Wake up in a shelter, and she’s alive! She’s lost her voice, but she’s alright. Pick Stand up rather than Go back to sleep: she tosses you a vial, and Take the vial is a free Laudanum (going back to sleep heals you a bit instead, but you’ll miss the vial). Then Take her hand and Farewell, Rasleen. She won’t come with us, she’s done fighting.
No grave to dig and no exp from the nomads this time, but who cares. She’s alive.
Explore the dead forest
There's a few options here, namely being the place we’ll use most of our Arrow and finding that hidden stash that Arturo mentioned.
Forage: 3-9 Palefoot Mushroom (v1).
If desperate for healing, these will do. 3 uses each at 6 hp a bite.
Delver deeper into the forest:
This is a tricky encounter with lots of different pathing. You’ll be swarmed by opium fiends and have to either bribe them, fight, or try to escape the mob.
If you talk to them they’ll demand payment in the form of gold, food or even Laudanum. With 4 STR you can successfully intimidate them with “you better put that knife away” and you’ll gain 20 exp, but there’s more exp to be had if fighting them.
A rule here is no more than 4 of the same action. For example, if you shoot them with your bow 5 times or stand and fight them 5 times, they’ll swarm you and you have to try and break free, which requires 5 STR (and gives 5 exp). Without enough STR you’ll take damage and lose some gold. This leads to “hunt them down” which is only successful with 3 RES, letting you shoot your bow one last time.
If you have enough STR and manage to break free, you’ll gain 5 exp and can fight 1 last fiend or begin the run away section.
I won’t go into all the separate paths on the run away section, but 3 fights seems to be the max before the fiends leave you alone. You take some damage the very first time you stop and fight right after running away once.
As such, to gain the most exp you’ll want to shoot your bow 4 times, then fight 5 times if you have 5 STR, otherwise only fight 4 times then start to run away, and get in 3 more fights.
Take note, that if you only have 4 STR and still want that 5 exp from break away, then save this section for later and clear out the northern cliffs first. The smugglers up there are worth close to 200 exp, so you may well get another level up.
Best opium fiend choices:
- Use your bow. (10 exp)
- Use your bow. (10 exp)
- Use your bow. (10 exp)
- Use your bow. (10 exp)
- Fight them. Opium Fiend: 5 exp, 1-3 gold, 1 random drop - Palefoot Mushroom (v1), Filthy Pipe (v1), Shiv (d1-4) (v1).
- Defend yourself. Crazed Opium Fiend: 5 exp, 1-3 gold, 1 random drop - Rusty Iron Hatchet (d6-7) (v24), Filthy Pipe (v1), Palefoot Mushroom (v1).
- Kill her. Starving Opium Fiend: 5 exp, 1-3 gold, 1 random drop - Sharpened Stick (d2-3) (v1), Filthy Pipe (v1), Palefoot Mushroom (v1).
- Take a look.
- Fight him. Demented Opium Fiend: 5 exp, 1-3 gold, 1 random drop - Spiked Club (d4-5) (v5), Filthy Pipe (v1), Palefoot Mushroom (v1).
- Kill him. Scarred Opium Fiend: 5 exp.
- Break free. (5 STR needed, gives 5 exp)
- Run away.
- Keep running.
- Attack him. Murderous Opium Fiend: 5 exp, 1-3 gold, 1 random drop - Sharpened Stick (d2-3) (v1), Filthy Pipe (v1), Palefoot Mushroom (v1).
- Fight them. Restless Opium Fiend: 5 exp, 1-3 gold, 1 random drop - Palefoot Mushroom (v1), Filthy Pipe (v1), Shiv (d1-4) (v1).
- Run away.
- Keep running.
- Attack him. Delirious Opium Fiend: 5 exp, 1-3 gold, 1 random drop - Rusty Iron Hatchet (d6-7) (v24), Filthy Pipe (v1), Palefoot Mushroom (v1).
Phew! A grand total of 85 exp plus other goodies. The real fiends here are maskpo & insats for coding this crazy section.
With that done, all we have left is to try and find the smuggler’s graveyard mentioned by Arturo.
Smuggler’s Graveyard
Do note that this area is only uncovered if you got the information from Arturo the Guardsman.
With your trusty Shovel at hand we can dig up some graves and get our hands on some juicy treasure.
First casket: 6-26 gold, 1-3 Amethyst (v30).
1 random drop - Golden Armband (v60), Ruby (v100), Emerald (v90).
The Golden Armband grants 1 protection.
Second casket: 7-22 gold.
1 random drop - Sapphire Ring (v250), Diamond (v200), Ruby (v100).
The Sapphire Ring only has a 10% drop rate. It also gives +1 CHA, now giving us 5 CHA boosting items!
Third casket: 7-33 gold.
1 random drop - Heavy Iron Scimitar (d12-18) (v100), Sapphire (v125), Black Diamond (v300), Diamond (v200).
The Heavy Iron Scimitar is a very powerful weapon, but we can get one a bit later, so aim for the Black Diamond.
Fourth casket: 1-49 gold, 2-4 Amethyst, 1-2 Ruby (v100), 1-2 Sapphire (v125), 1-2 Emerald (v90).
That’s a lot of treasure! We could retire and enjoy the good life, but Mantis has to pay first.
Everything in this area is now done, so we can explore the northern cliffs.
Northern Cliffs
Access this area from the stone tower and follow the path. We’ll come across a cowled thug and we have a few ways to deal with him. Those taking the non-violent path can hide and wait or with 4 CHA, talk your way past him. The bow can be used but don’t give any exp. Best move is to hide and ambush (4 AGI).
Killing the Cowled Knife Thug will give 20 exp. He’ll always fall off the cliff, so no gold or items I’m afraid.
The next encounter is one that quite a number of new players have had trouble with, tougher than your average thug. The archer can give you a game over if you try to run past him without dealing with him.
Those wanting to be non-violent will need 5 CHA and to bribe him with gold or Laudanum.
You can shoot him with your bow, then charge at him (5 AGI) or dodge the arrow (4 AGI) otherwise you get hurt. Running across the bridge and avoiding getting shot also needs 5 AGI.
It’s easier to start negotiating, which lets you walk across the bridge, then you can climb the tower (4 AGI or get hurt) and attack him.
Rogue Archer: 20 exp, 1-8 gold, Tusk Medallion.
Approaching the palisade, you can climb over with 4 AGI, but it’s much more fun to deal with the gate guard.
With 5 CHA, you can attempt to talk your way past him, then quite humorously wait out his patience until he lets you past.
You can actually just sneak past him and open the gate with only 3 AGI.
If wanting to fight then once again we can use our bow. You won’t get any exp, but the first shot will actually do quite a lot of damage. 2 more shots can be done but they will do just minor damage.
A sneak attack (3 AGI) won’t do quite as much damage as a first Longbow shot, but it saves you an Arrow.
Lawless Colossus: 30 exp, 1-8 gold, Tusk Medallion.
He can be quite the difficult fight for the unprepared. Poor fellow, I actually feel a bit bad attacking this unperceptive brute.
Inside the palisade, enter the house and you’ll talk with a drunken smuggler. 50 exp will be gained and the tusk mob quest will be completed.
Now this guy is very important for those wanting to kill the Ironclad Vagrant.
You want to kill the smuggler using only basic attacks, so the advantage points meter is full when you’re done.
Drunken Smuggler: 20 exp, 1-8 gold, Tusk Medallion.
He’s a pushover who misses more than he hits. As long as you don’t spend any advantage on combat actions, any weapon will fill the meter to the max by the time he drops, so there’s no need for a weak weapon anymore. Swap to the gear you want for the next fight afterwards, before you climb the ladder. (The Ironclad Vagrant guide fills the meter with a Parry weapon and a shield instead, which is safer.)
Got a full meter? Yes? Good. Now we can have a chat with the famous Ironclad Vagrant.
Search the room first to find the Smuggler's Notebook (v1). This can be shown to Hadrian Trout for 25 exp.
The Ironclad Vagrant
We’ll find Mr. Ironclad chained in the attic. He wants his freedom for the information on Mantis. We’ll get a Bronze Key (v1) that can be used to unlock his chains. You can break your promise and not unlock him, but freeing him gets you 50 exp. Whatever you decide here, it comes back in the ending.
Note that if you leave the house you’ll lose the advantage point meter that’s pre-stacked from the drunken smuggler.
Taunt him and we get the chance to attack him… but make no mistake, this is by far the toughest fight on the island, and it’s completely optional.
Back in the real-time days he was only beatable thanks to a Sweep + Stab timing exploit the players found. That’s gone along with real-time combat. He’s now a proper turn-based boss, and he’s even one of the targets of the Apex Predator achievement. Here’s what we’re up against: roughly 1,650 health, 60 armor (every hit you land loses 30 damage), and up to 4 punches a turn at 32-47 damage each, starting in Aggressive stance. He’s also immune to bleeding. The upside is he can’t dodge, has no shield to block with, and he’s slow when he isn’t in Aggressive stance.
It takes a dedicated build to beat him, and most likely a playthrough aimed at it from the very start. AntiMatter138 did it at level 12 with a high-AGI build (an Iron Morning Star and the Crimson Falcata, stacking Hamstring, Stun and Puncture on him), and their write-up has its own page: Ironclad Vagrant guide.
You can’t just gather that gear whenever you like, as some of it is only found early on, in places you can’t go back to. The Iron Morning Star only drops from the Shadow Lion in the catacombs on the Isle of Dusk, and the Crown of Wildflowers and Heart of Stone only come from Mev dying on the voyage (so killing her at the Megalith, the power gaming route I suggested, rules them out). They also only just made level 12 in time, so every bit of exp along the way counts.
Either way, come in with a full advantage meter from the drunken smuggler.
Save before you taunt him. If it’s not working, there’s no shame in reloading and taking the 50 exp for freeing him instead.
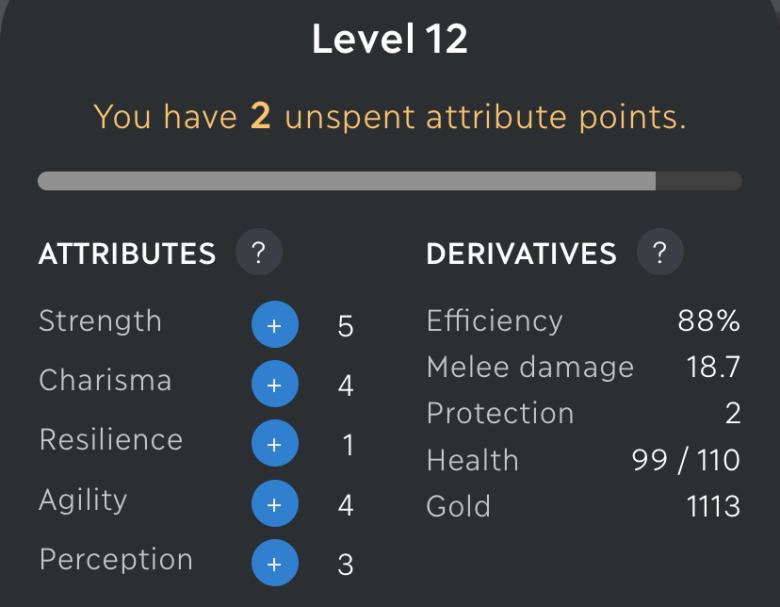
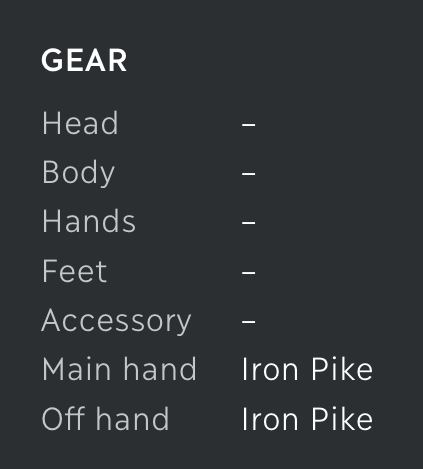
A setup recently used to defeat the Ironclad Vagrant.
Defeating the Ironclad Vagrant will give you a massive 500 exp! Not too shabby.
There's nothing else for us on this island. Say your farewells to Rasleen’s grave (or to Rasleen herself, if she lived). It’s time to finish up business in Set and head to the city of Roeburgh. Tricky as it’s currently under siege by a foreign army.
Final business in Set
"Numerous fishermen and other locals are gathered here. Their hostility seems to be directed toward the druids on the ship. Waving his fist, one fisherman shouts: “Green-cloaks be damned!” With all this commotion, it’s hard to tell exactly what is going on.
There’s a few final interactions to be had in Set. Visit the tavern to rest and heal up. If you saved the nomads then you can inform them of Rasleen’s death for that 20 exp. If Rasleen is still alive, tell the elder she stayed behind. There’s no exp for it, and the place is so packed with nomads there’s no room to rest anymore.
Choosing “Find out what’s going on” at the harbor will give you insight into the commotion. Hadrian Trout wants to commandeer the ship so he can send reinforcements to Roeburgh. Perfect for us as we want to head that way, but the druids aren’t having it.
If you don’t interfere then the druids will lose and perish, so offer to talk to Ato Triasteen instead.
If you kept your CHA at 2 this far, then you’ll fail to convince him and have a chance to fight.
Ato Triasteen: 10 exp, 2-6 gold.
1 random drop - Longbow (d12-22) (v100), Iron Short Sword (d6-7) (v35).
This kinda makes sense if you’re only concerned with gold and loot, but there's much better exp to be had in successful negotiations.
When leaving the ship, you’ll need 5 CHA otherwise Hadrian Trout will arrest the druids. Saving them from prison will give 50 exp.
The ship will travel to Roeburgh at sundown. Don’t do this yet, we still have a few final tasks.
If you saved Ato and the druids, and try to talk to Calvino the Boatman, you’ll find he’s taken them to Graefir Island.
Once again travel to Graefir Island. You’ll be able to talk to Ato again and gain 50 exp. Well worth the 5 gold.
The Wolf Shrine
There’s a new town crier who’s recruiting for the war effort. Talk to Hadrian Trout and show him the Smuggler's Notebook for 25 exp. Also hand in any remaining Tusk Medallion.
Mev
If Mev sailed with you and is still breathing, she’s hanging around Roe Island. Head out past the abandoned farm and explore the wilderness to find her picking flowers. She’s in a rare good mood, so chat away. At the end she gives you a Crown of Wildflowers (v50) for letting her tag along (+10% melee evade and better initiative). Insult the gift and she’ll try to cave your head in.
Mev: 100 exp, 52-106 gold, Black Phosphorus (d8-16) (v300).
Cartel Assassin
This is an encounter that can be easily missed, so it gets its own section.
Visit the longhouse and you’ll find a woman in a black cloak observing you. If you talk to her you can find out that she works for the Khiris Cartel.
With 6 CHA you can manage to feign ignorance, she’ll call you a chump and you won’t be seeing her again. Otherwise, if you fail the check or let her leave, she’ll ambush you when heading towards the harbour. With 6 AGI you can avoid her first attack and either fight her in the street or run for help. If you saved the nomads, it’s quite the humorous scene.
If you attack her in the longhouse, you’ll get a free bottle of Moonshine if you apologize for the mess.
Cartel Assassin: 30 exp, 6-12 gold, Snake Dagger (d3-9) (v35).
1 random drop - 1-2 Amethyst (v30), Emerald (v90).
The Emerald has a 25% drop rate.
With that dealt with, our business in Set has finally come to an end. Do any last trading and get ready to sail to the city of Roeburgh. Invaders be damned.
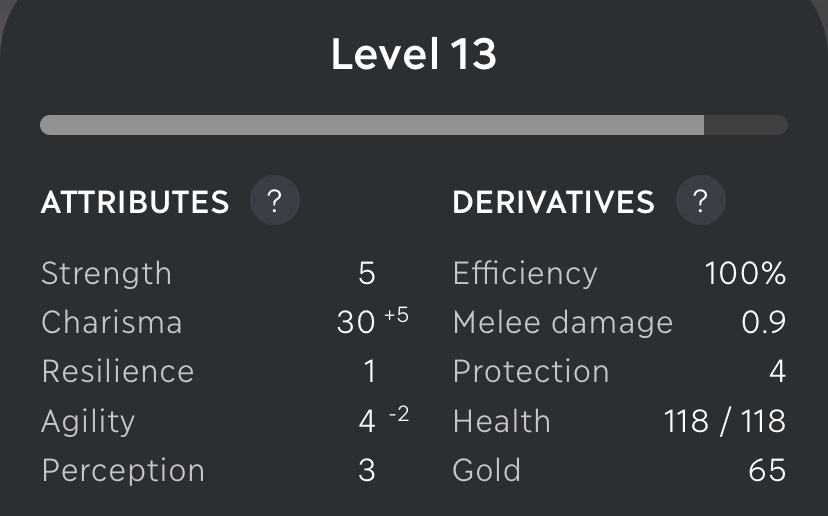
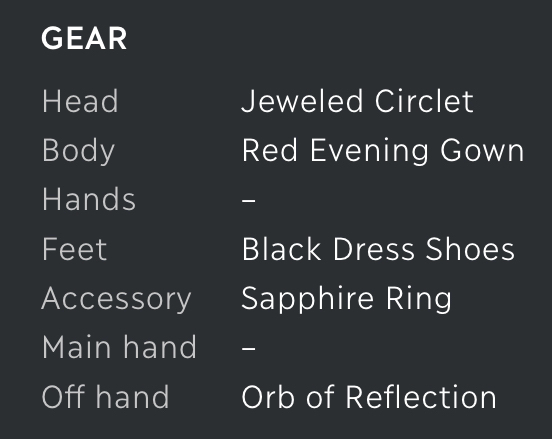
For fun and games, see how many Exotic Perfume you can buy before leaving.
Journey to the Mainland
Hours pass by as you watch the soldiers prepare for war. They sharpen their blades with whetstones and adjust the fit of their suits of armor. Some of them are young men with fear in their eyes. Others are seasoned veterans with stoic demeanors. A few crack wise to lighten the mood.
Once we set off, we won’t be able to return to Set. Having a backup save might be ideal. I usually keep a spare save file before entering the house to fight the Ironclad Vagrant.
Progress the story and we’ll arrive at the shores of the great city of Roeburgh. Follow the soldiers and we’ll come across some refugees. If you choose to help them, the more gold you give, the more exp you’ll gain.
3 gold for 5 exp. 10 gold for 10 exp. 20 gold for 15 exp. 50 gold for 25 exp.
Step through the gateway and the music will change. Dang, the composer Befly, giving everyone chills.
Time to part ways with the soldiers. Explore the burning city for 20 exp. We need to get through the assaulted city and make our way to the Noble Heights.
Some burning wreckage will damage you unless you have 4 AGI.
You’ll take damage from a cloud of dust and smoke unless you have 4 RES.
Further down the street we’ll come across a mutilated soldier taking his final breath.
Rifle through his belongings: 3-6 gold.
1 random drop - Iron Falchion (d8-11) (v50), Studded Leather Helmet (a3) (v30), Bronze Glaive (d4-18) (v65).
1 random drop - Studded Leather Belt (a1) (v25), Studded Leather Boots (a3) (v30), Studded Leather Gauntlets (a3) (v28).
The Studded Leather Belt can be a nice accessory if you didn’t get the Bone Crown.
Moving forward, there will be a platoon of foreign soldiers to avoid or deal with.
Foreign Soldiers
We have a choice here, to deal with them or avoid them via the alley that's found by looking around. Technically we can actually do both.
With 3 PER, when you keep listening, you’ll identify that at least 4 soldiers are heading in your direction.
As a new player, the foreign soldiers can be quite tricky to deal with. The Foreign Commander is quite the beast (4 attacks a turn, hitting for up to 34), but luckily for us the fights come back to back, so we can fill the advantage point meter on the soldiers with basic attacks and spend it all on the commander. The Iron Pike’s Sweep can’t be blocked by those tower shields and leaves him Incapacitated (no dodging, double damage), so follow it up with Stab. Do it early: below half health he switches to Defensive stance, which makes him much harder to knock down.
If you choose to take them head on, then a bow attack will do nothing. If you charge at them, you need to have a shield equipped and 3 AGI to block the attack. Otherwise you need 5 AGI to dodge or you’ll take 31 damage, then without 3 RES it’ll be game over.
If you choose to run away then successfully moving in the shadows requires 5 AGI. If you fail, a shield can be used to block the incoming burning arrows (or chosen to run across the courtyard).
If we take the alleyway, we can do an alternative route that lets us scavenge items from a dead body and also fight with a Foreign Skirmisher.
Taking the alley also lets us hide from the passing soldier platoon, or look at them from the alley and sneak attack for damage (4 AGI or more giving best result) or shoot Foreign Soldier 1 with a bow for 10 exp, then finish him off afterwards for another 10 exp.
If you sneak attack you don’t take the alley route however.
As such, the best route is to hide in the alley and shoot Foreign Soldier 1 with a bow. This lets us fight the 3 remaining enemies, then finish off the hurt soldier, claim his items, and still take the alley route.
Regardless, all the soldiers including the commander have different stats, but all drop the same kind of items. Only the skirmisher has a different loot table.

My gosh, that's a lot of equipment to choose from. Those focused purely on gold income will aim just for the Iron Scale Hauberk and Panossian Red Wine. The Raven's Beak is a really good 1 handed mace however, so consider 1 of those.
Shield users take note that while the Red Tower Shield has the highest block % in the game, in Noble Heights you can buy a Desert Cavalry Shield. It has 2% less block but grants 3 protection.
In the alley, the dead soldier has the same drops as the last one we scavenged.
Plunder the corpse: 3-6 gold.
1 random drop - Iron Falchion (d8-11) (v50), Studded Leather Helmet (a3) (v30), Bronze Glaive (d4-18) (v65).
1 random drop - Studded Leather Belt (a1) (v25), Studded Leather Boots (a3) (v30), Studded Leather Gauntlets (a3) (v28).
Finally we have the Foreign Skirmisher. Escaping from him is randomish if successful or not. The more AGI you have, the easier it is to escape. Might as well confront him!
Foreign Skirmisher: 50 exp, 5-8 gold, Iron Morning Star (d5-13) (v50).
1 random drop - Black Leather Hauberk (a4) (v100), Studded Black Leather Helmet (a3) (v40).
1 random drop - 1-2 Amethyst (v30), Bandages (v5), 1-2 Red Apple (v1).
A rather intense section of the game. Cross the bridge and we’ll now be arriving at the Noble Heights of Roeburgh.
Noble Heights
You ascend the hill on your way to the castle gates, knowing that Mantis lurks somewhere beyond those walls. As the sun rises above the stone towers, the gates are swung open, allowing numerous knight cavalry to emerge from the Noble Heights. They ride past you, heading for the bridge to the west.
Crossing the bridge we’ll have words with some passing Cavalry. You’ll get a Coded Message (v1) that needs to be given to the Lord of Highcastle. Once inside the city, you’ll get 50 exp.
You’re soon informed that Lord Bremerton is missing. Hmm… that wouldn’t have anything to do with Mantis now would it?
Talk to whomever you like and progress to Selikro Plaza. We have 4 areas that can be explored from this section. At the inn you can rent a room and rest to recover any lost health, approaching the bell tower can take you to the church which gives a good side quest. To the northwest is Emerald Avenue, the main hub for trade in this area. Finally, to the south we have Soma Gardens.
Stray Wolf Inn
Inside the inn, renting a room will cost 50 gold unless you have 4 CHA, in which case you can get a discount and only pay 25 gold. It’s worth doing as you’ll be able to rest as often as you like to recover health.
Talking to the innkeeper, you can ask him a few questions. After asking about the strange women, as you’re leaving, the maid will stop you and hand you a Brothel Token (v50) that she found. Interesting, a clue!
Naturally, the maid will also sell you some drinks.
Maid Stock:
- Maleqite Brandy (v25)
- Panossian Red Wine (v30)
- Phenrisian Cider (v10)
- Roeburghian White Wine (v20)
If you have to recover health using these, then the wines have the better healing values.
Soma Gardens
This will be an important area for a few things as we progress. The thugs from the church side quest will flee here, and once discovered, it’s also the access point for the hidden Sleep Temple. Feel free to talk to the couple. We can also enter the walled orchard and forage for some apples.
Forage: 3-7 Green Apple (v1).
A nomad merchant has also set up shop here. He’s rather unique though as he has 2 different shops. Ask him questions, and with 3 CHA he’ll let you see his special merchandise, which happens to include the long awaited Sacred Elixir. Each one of these used will permanently increase your PER by 1.
Nomad Stock:
- Arrow (v4)
- Short Bow (d8-18) (v30)
- Iron Buckler (b15%) (v30)
- White Shawl (a1) (v10)
- Yellow Sark (a2) (v25)
- Torch (v2)
- Sanguine Draught (v20)
The Sanguine Draught is new. Drink one before a big fight and you can’t bleed for a while, very handy against Mantis and his cut-happy enforcers.
Nomad Special Stock:
- Desert Cavalry Shield (b23%) (v100)
- Sacred Elixir (v350)
- Advanced Lock Pick (v150)
Note that the Desert Cavalry Shield also gives you 3 protection.
If you’ve already settled on what end game items you’ll be using then feel free to buy some Sacred Elixir to boost your PER. Please note that the nomad merchant has a very high CHA score, so you really want to avoid selling items to him.
The merchant with the lowest CHA in Noble Heights is the armorer at Emerald Avenue.
The cheapest you can get Sacred Elixir for is 263 gold (8 CHA).
Nothing else to do here (yet). So let's check out that church side quest.
The Church
Note that the missing servant side quest can’t be started straight away. Talk to the preacher first (he’s busy preparing his sermon), then go to Emerald Avenue, Soma Gardens or Lord’s Boulevard and walk back to the plaza. The church bells will ring for the sermon.
Listen to the sermon then talk to the preacher. Ask him questions and you can find out that the preacher is having issues with his servant.
He wants you to go and remind the servant about his duty. If you refuse here then the quest is forever lost, so make sure to say yes.
Head to Lord’s Boulevard and we can now access the Servants’ Quarters. Inside the servant’s abode we’ll find 2 debt collectors and the servant's dead body. A few questions can be asked, then you can either let them go peacefully or fight them, but they’ll escape.
Either way, you’ll get 10 exp for finding the servant’s dead body.
If you fight them or choose to flee, when the debt collectors escape/leave you can follow them and use your bow but you’ll miss.
Head back to Lord’s Boulevard. The debt collectors have gone to Selikro Plaza. On our way there a helpful noblewoman will point the way to Soma Gardens. If we visit the church first and inform the preacher about the situation, he’ll want the collectors dealt with. If you accept he’ll make sure there won’t be any legal repercussions for you.
Technically we can refuse and end the quest here for 20 exp. We can still head to the gardens and deal with the collectors, but you won’t get a reward from the preacher, so avoid doing this.
At Soma Gardens, enter the walled orchard and we’ll find the debt collectors and many, many options. Feel free to listen in on their conversation for a few name drops.
You can use your bow before fighting, but won’t get any bonus exp.
The best route for experience is to successfully sneak up on the debt collectors (5 AGI) and you’ll insta-kill the first one for 50 exp, then can fight the second. You don’t get the first collectors items though, so if wanting more gold, just fight them normally.
So make your choice on how to deal with them.
Cartel Debt Collector: 30 exp, 25- 49 gold, Maul Hammer (d6-22) (v40), Green Apple (v1).
Cartel Paymaster: 35 exp, 31-119 gold, Steel Dagger (d4-10) (v80).
Regardless of how you dealt with them, you’ll get 30 exp for finishing this quest, so we can now report to the preacher.
If you let the debt collectors get away you’ll only get the 20 exp and nothing more from the preacher. If you killed them, then you’ll also get an extra reward.
Depending on how you answer the preacher will affect what you get. Selecting the last 2 options will forfeit the reward.
Phenris, God of War and Justice: Wolf Medallion (v100).
An accessory that will give you +1 RES.
Meym, God of Death and Night: Rook Medallion (v100).
An accessory that will give you +1 PER.
Nierva, Goddess of Fire and Deception: Fire Medallion (v100).
An accessory that will give you +1 CHA.
I shouldn’t have to tell you which accessory is the best.
You should already have a CHA boosting accessory in the form of the Sapphire Ring, so there’s no point taking the Nierva reward.
The last boss Mantis has a very high AGI score, so the Meym reward makes most sense. I’ll always tell new players to take the Rook Medallion. Bare in mind that we have been playing a min/max game. Perhaps you’ll be able to buy so many Sacred Elixir that PER simply won’t be an issue for you and you’ll want to have a tiny bit more beefiness by taking the Phenris reward. Or maybe you’re a shield user, so you’ll want the RES anyway.
Honestly, it doesn’t matter a great deal which reward you take. We can get a Red Stone Bracelet at the end of the game which gives 2 protection and gets you into the fight quicker. It doesn’t give AGI anymore though, and it takes the same slot as the medallion, so pick whichever suits you.
As a final note, you can speak to the knight guardsman at Highcastle about the dead servant. Alrighty, shall we finally do some shopping at Emerald Avenue?
Emerald Avenue
We have 2 main vendors and the long awaited Antiquarian. He’ll get his own section.
The Armorer
This is the ideal location to sell your items, as they have the lowest CHA in the area.
Armorer Stock:
- Iron War Hammer (d10-30) (v100)
- Knightly Sword (d6-14) (v90)
- Steel Claymore (d12-18) (v150)
- Gilded Plate Cuirass (a9) (v300)
- Great Helm (a8) (v140)
- Highland Targe (b16%) (v65)
- Iron Plate Greaves (a7) (v125)
- Winged Iron Helmet (a5) (v80)
It's indeed possible to beat Mantis with your current equipment, but the Iron War Hammer, Gilded Plate Cuirass and Iron Plate Greaves are rather tasty upgrades. You can even equip the Spiked Gauntlets with this set up. You did purchase those right? It’s a very STR reliant build, but probably the most powerful.
The Clothier
Unless you’re playing dress up, the only item you’ll want to consider is the Black Linen Cloak. Take a look at the description. It might come in use.
Clothier Stock:
- Black Bonnet (a1) (v10)
- Black Linen Cloak (a1) (v6)
- Black Silk Jacket (a1) (v35)
- Cravat (a1) (v90)
- Domino Mask (a1) (v8)
- Kidskin Gloves (a1) (v20)
- White Cloth Sandals (a1) (v8)
- White Robe (a1) (v25)
- Wool Coat (a2) (v32)
The Antiquarian
Here we finally are, all those specific treasures that’s been saved up can now be sold for a tidy profit. If money isn’t an issue then you don’t have to sell, but we’re in the end game now, so don’t be afraid to part with things like the precious Cipher Stone.
You can get a higher price for certain items, depending on your CHA.
| Item | Will he buy? | Offered Price | Other Notes |
|---|---|---|---|
| Bone Crown | No | ||
| Bronze Ankle Bracelet | Yes | 25 gold | 20 gold thereafter |
| Ceremonial Sash | No | ||
| Cipher Stone | Yes | 200 gold | 600 gold with 7 CHA |
| Clay Tablet | Yes | 75 gold | |
| Commemorative Plate | No | ||
| Crimson Falcata | No | ||
| Death Mask | Yes | 60 gold | 80 gold with 4 CHA |
| Framed Portrait | No | ||
| Fraternal Headpiece | No | ||
| Golden Bracelet | Yes | 90 gold | 130 gold with 4 CHA |
| Golden Chalice | Yes | 70 gold | 80 gold with 3 CHA, 90 gold with 4 CHA |
| Heart of Stone | No | ||
| Jade Idol | Yes | 60 gold | |
| Mask of Nierva | Yes | 50 gold | 70 gold with 5 CHA |
| Orb of Reflection | Yes | 40 gold | 45 gold, 50 gold with 2 CHA |
| Raven Mask | Yes | 30 gold | 20 gold thereafter |
| Red Stone Bracelet | Yes | 90 gold | |
| Silver Brooch | No | ||
| Silver Chalice | Yes | 35 gold | 45 gold, 60 gold with 4 CHA |
| Wolf Idol | Yes | 20 gold | |
| Wolf Necklace | Yes | 12 gold | 16 gold as final offer |
| Wooden Bracelet | Yes | 25 gold | 30 gold as final offer |
| Wooden Hand | Yes | 50 gold | 60 gold as final offer |
Even if you don’t sell much, at the very least, show him the Silver Brooch for information on House Verdandi.
Golden Serpent Parlor House
Walk down the avenue to find this place. It’s where the Brothel Token we got earlier can be used.
Talking to Madam Brimstone will only reveal that she’s a closed book, not letting any information slip out.
She sells just 1 item; Mead (v5).
With the Brothel Token we can visit the back rooms and get some answers.
Enter the second room to talk with the courtesan. We aren’t here for anything else, just answers. When she gets upset, remain passive and don’t comfort her.
Warning! If you mention Mantis then her affliction of the mind will take over and she’ll try and kill you. Killing her will give 15 exp.
We can now go back and demand the truth from Madam Brimstone. The guard will interfere and you’ll have to fight unless you have 6 CHA. Going the non-violent route means you’ll have to bribe her, costing you 100 gold. Bah! I say deal with the guard in a more physical manner.
Brothel Guard: 15 exp, 4-13 gold.
If you attacked the guard, then after Madam Brimstone tells you everything she knows, you can either let her go or kill her for 10 exp.
If you killed her you’ll read one of my favorite lines…
“Such is the fate of those who align themselves with the Cartel.”
Anyways, if you attacked the guard, we’ll then be able to search the room and get some booze.
Plunder the liquor cabinet: 3-6 Mead (v5).
1 random drop - Maleqite Brandy (v25), Panossian Red Wine (v30), Phenrisian Cider (v10).
We now have a major lead, so can go back to Emerald Avenue to find the gambling den.
The Gambling Den
Found via Emerald Avenue after you gained the information from Madam Brimstone, we’ll come across 3 cloaked men in an alley.
The non-violent route requires 5 CHA in order to talk your way past them.
You can shoot them with your bow, but won’t get any bonus exp. The second bow shot has an AGI check of 5. Escaping after shooting is one of those random checks, with the more AGI you have, the higher the chance.
Otherwise, what's wrong with killing more Ca.el scum eh?
The Cartel Enforcer gives 25 exp, the Cartel Hoodlum gives 20 exp, and the Cartel Thug also gives 20 exp.
Head inside and we’ll meet with Cleo Verdandi, who is actually quite happy to give us the information we want. If you attack her here though, her brother will give you a game over.
Leave the gambling den. If you return you can attack them, but you may want to hold off on that just for the moment. If you get stopped from trying to enter the sleep temple, you can return here for a written invitation or a key. Then kill them afterwards.
They can be rather strong, so good luck! Lucian hits like a battering ram but is slow; Cleo is quick and hard to pin down.
Lucian Verdandi: 50 exp, 21-43 gold, Heavy Iron Scimitar (d12-18) (v100).
Cleo Verdandi: 50 exp, 21-32 gold.
Head back to Soma Gardens, and we finally have the option to find Mantis’s secret palace.
Sleep Temple
Flanked by granite columns, the reinforced wooden door is marked by the insignia of the Khiris Cartel. The stingray beckons, reminding you that your nemesis might dwell somewhere on the other side.
Before we get started, I need to mention that there are 7 endings in the game. Each ending depends on what happens in the sleep temple (though the epilogues remember a lot of what you did before). As such, you may want a backup save file before you do anything here. Don’t be too paranoid though, it basically boils down to 3 things.
- Are the 12 enforcers alive?
- Convinced Avon Lorca? (4 and 5 CHA, both lines)
- How you deal with Mantis.
So no matter what else you do in the temple, as long as you haven't yet fought the 12 enforcers, and as long as you haven’t passed both of Avon Lorca’s CHA checks (4 and 5 CHA), you can access every ending, depending on your taste.
So with that in mind, I’ll detail the guide as normal.
Head to Soma Gardens to find the sleep temple and you’ll gain 100 exp with a quest update.
Accessing the Sleep Temple
You can avoid the front gate all together and climb the wall with 4 AGI.
If you have a bow equipped you can actually attack the gate guard from the sandstone path. You won’t get any bonus exp and trying to escape leads to a gameover. After shooting him, if you wait, you can dodge and counterattack if you have 5 AGI.
If you head to the front gate, there's a few things we can do with the guard. Talk won’t work, so try to open the gate instead. Bribe won’t work either, so we need to negotiate.
If you have a Black Linen Cloak then wearing that will let you blend in, but you’ll still be a new face. You can tell the guard to relax, but he’ll want proof. You need 5 CHA to successfully convince him you’re legit, otherwise he’ll attack. If you convinced him, he’ll confirm Mantis is inside, and with 4 AGI you can pick his pocket for a temple key.
You can still come back and attack him afterwards, which is kinda needed as if he’s left alive, this route can end up with a special game over. The gate guard will ask around and confirm you’re an imposter, then deal with you.
The other route is to say you were invited, but misplaced your invitation. Go back to Cleo Verdandi at the gambling den, and she'll provide you with a Formal Invitation (v0).
Cleo can also provide you with a Temple Key (v1) if you can’t unlock the sleep temple door.
Cartel Guardian: 30 exp, 2-8 gold, Temple Key (v1).
1 random drop - Iron Halberd (d10-14) (v80), Iron Chainmail Shirt (a5) (v80).
Note that after killing the guard, you’ll no longer be able scale the wall for quick access.
Walled Garden
From here we can directly go inside the sleep temple if we have an Advanced Lock Pick or Temple Key.
Explore the garden and we’ll come across a cartel sentry. The bow can be used, but for no bonus exp. If wearing a Black Linen Cloak you can walk past him and even pick his pocket with 4 AGI for a Temple Key, but you’ll lose the chance to fight him. You can’t talk to this guard without him attacking you.
If you hide behind a tree you can let him walk past or successfully sneak attack him with 5 AGI.
Cartel Sentry: 30 exp, 7-12 gold, Temple Key.
After killing him, you can hide the corpse if you wish.
Backyard
The only thing we can do in the backyard is scale the wall, which requires 5 AGI.
The window we climb through acts as a shortcut to the dormitory part of the temple, so we’ll continue the guide from the front door.
Sleep Temple 1F
From the front door we can check the ballroom. Look around and we can find an alcove and a cloakroom.
In the alcove we can talk to a nobleman and young woman. After chatting, leave and come back and they’ll be fast asleep, letting you pick the nobleman’s pocket.
Sleeping Nobleman: 29-43 gold, Laudanum (v50).
Back in the ballroom, looking behind the curtain reveals a small cloakroom. Here we can claim 3 Black Linen Cloak. You may want to keep 2 on your person. 1 for you to wear and the other to give a certain captive lord we’ll rescue.
The only way forward now is through the dining hall.
Dining Hall
You should know this area is special due to the music change and extra warning about entering.
So I'll say this nice and loud.
Wear a Black Linen Cloak!
This is the area containing Mantis’ 12 cartel enforcers. While wearing a Black Linen Cloak you can eavesdrop on a rather entertaining, long conversation and walk past them without issue. If you enter this area without a Black Linen Cloak equipped then you’ll have to fight all 12, and while this won’t be an issue for our current state, it’ll affect what endings you can choose.
So avoid fighting them for now. We can create a save game with everything else done, only leaving these 12 alive, thus letting us easily decide what ending we want.
When/if you do fight them, you can save and heal after each fight while also stacking your advantage point meter. The Executioner can Parry, and a few of them Cut, so a Sanguine Draught before entering the dining hall stops the bleeding. Let’s check the kitchen before detailing the huge fight.
The Kitchen & Pantry
The kitchen is rather unappetizing but leads to the pantry with lots of lootables. A Torch is needed to enter, and an Advanced Lock Pick for the strongbox.
Pantry top shelf: 1-2 Maleqite Brandy (v25), 1-3 Panossian Red Wine (v30).
Pantry middle shelf: 4-8 Mead (v5), 2-4 Phenrisian Cider (v10).
Wooden Box: Rawhide Bone (v1). (Used for a non-violent way past the guard dog).
Strongbox: 6-12 Laudanum (v50).
Getting 12 Laudanum is huge!
Now we can either enter the stairwell to reach the second floor or take on the enforcers.
Battle the 12 Enforcers
I’ll stress this one more time. Only do this if you’re after a certain ending in which the enforcers are all dead. The exp they give is huge, letting players reach level 15, but don’t let that be a factor. Explore all the endings before you settle on your favorite.
Enter the dining hall without a Black Linen Cloak equipped and you’ll be attacked straight away.
- Dodge the attack (4 AGI) or use your shield (any shield equipped).
- Cartel Swordsman: 30 exp.
- Cartel Marauder: 30 exp.
- Cartel Ruffian: 40 exp.
- Cartel Goon: 40 exp.
- Cartel Roughneck: 40 exp.
- Cartel Scoundrel: 40 exp.
- Fight back (4 RES) or retreat.
- Cartel Bruiser: 50 exp.
- Cartel Hatchet Man: 50 exp.
- Cartel Rogue: 50 exp.
- Cartel Raider: 50 exp.
- Take a look (take damage), step away (no damage) or use your shield (any shield equipped).
- Cartel Cutthroat: 60 exp.
- Use your bow (any bow equipped) if desired, but no bonus exp.
- Cartel Executioner: 70 exp.
Such a damn good section!
A grand total of 550 exp will be gained.
Sleep Temple 2F
Enter the dormitory and we can find a few lootables as well as the shortcut via the backyard window.
If you have less than 5 AGI and try to climb down from the window, you’ll take a tumble for 10 damage and land in the backyard. It used to break your neck, so count yourself lucky.
First drawer: 3-6 gold, 1-2 Mead (v5).
Third drawer: 1-2 Laudanum (v50).
The last thing to check is the sleeping man. He won’t wake up, so you can pick his pocket for a Cell Key (v1) and/or kill him in his sleep for 10 exp.
Atrium
We can glean a bit of information here from looking closely at the map. There’s two doors to pick from. The red door leads to the armory and holding cells, while the black door leads to the master bedroom.
If you enter the black door/master bedroom, then you enter the final state of the game. You’ll be fighting the final boss and will get an ending depending on your recent choices and how you handle the fight.
As such, only enter the black door when you’re ready to end the game.
Be careful with your save files as well, always have a backup.
So the last thing we can do now is check the armory and holding cells.
Armory
You can take one of the swords here to gain a Steel Scimitar (d8-12) (v60).
The next area is a torture chamber.
Torture Chamber
Look around and you’ll find a prisoner. Releasing him gives 10 exp and we’ll find out he’s Lord Carolus Bremerton, the person who’s supposed to receive the Coded Message. Giving him the message grants 50 exp.
You can say farewell here or talk a bit more before he leaves. You have the option to give him a Black Linen Cloak to protect his dignity. It’s not necessary, but seems important story wise, so that's up to you.
If you check the iron maiden and have 4 PER you can find a Red Stone Bracelet (v150).
It’s a handy accessory that gives 2 protection and boosts your initiative, so you’ll usually act first.
Search the torture chamber to find a book, A New Breed of Slaves (v1). Give it a read.
Explore the narrow passage to find the holding cells.
Holding Cells
If you keep walking then it’s game over. Light your Torch and we’ll be faced with a guard dog.
You can kill the beast for 50 exp or take a step back and throw the dog that Rawhide Bone we found earlier.
Approach the cell door and we’ll find Avon Lorca, a very famous gladiator that's been locked up.
Don’t talk to him if you want to see one of the worst endings! (Or just fail the CHA check).
Make sure you say that you’re looking for Mantis then “maybe we can help each other out.”
You can then unlock the cell door for 10 exp using the Cell Key or an Advanced Lock Pick (a Crude Lock Pick works too, but gives no exp).
When freed, Avon Lorca wants to leave the place immediately, but we don’t want that to happen. After all he agreed to help us.
Passing both of Avon Lorca’s CHA checks is key to unlocking a certain ending. Use both lines below, the game checks that both succeeded. We don’t HAVE to take that ending, but it gives us the option.
“Sounds like you're afraid of him” is a 4 CHA check.
“No man is immortal. If we work together, he can be defeated…” is the 5 CHA check.
He’ll leave for now. If you were successful then he’ll come to your aid against Mantis at your most dire moment.
The other prisoners can’t be convinced to leave. All we have left now is the black door.
Final Character Check
Nearly there! It’s been a fun ride, might as well check what sort of character you could have. Remember that you can’t reach level 15 unless you kill the 12 enforcers.
Depending on what you’re willing to sell, a min/maxer could have around 4000 gold to play with. Use this to purchase final equipment and buy Sacred Elixir.
Do take note though that it's indeed possible to still beat the 12 enforcers and Mantis with equipment found on Dusk Megalith, depending on your stats of course. Equipment such as the Stone Maul or Black Phosphorus, with Rusty Iron Chainmail & Gotterdammerung. It might be a challenge but those fights are still winnable. The Iron Pike’s Sweep followed by a Stab still hits like a truck, once you’ve built up the advantage for it.
I favour a high STR, tank type using a 2 handed weapon build and think it's the most powerful build. Infact too powerful, making Mantis a cakewalk. Don’t let this stop you from using a shield RES build, or 1 handed weapon fast AGI build. Your choice!

Tons of gold to play with if happy to sell all your treasures.
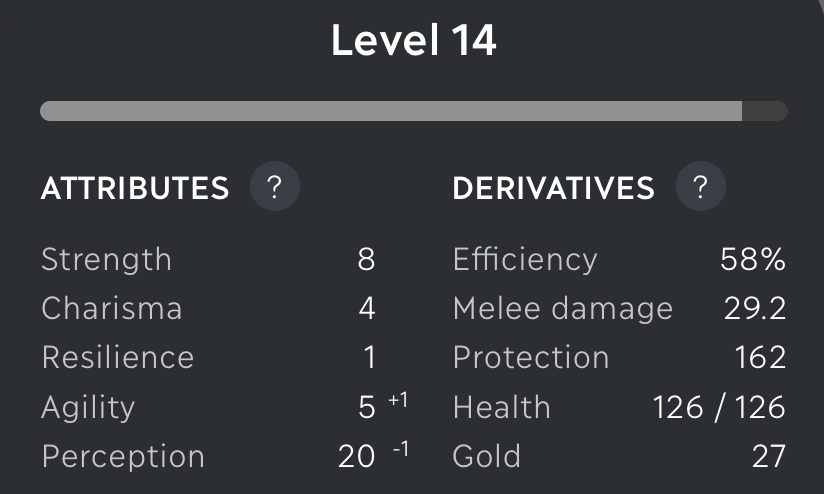
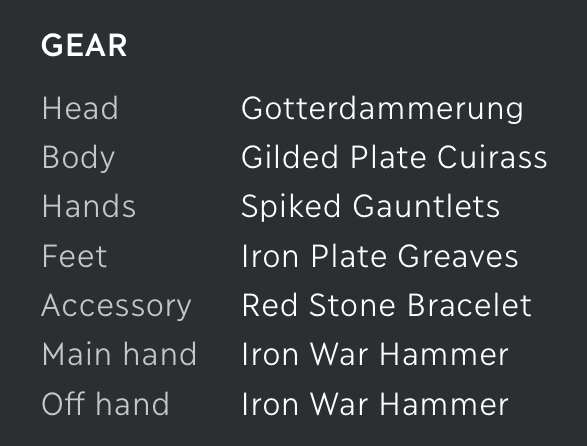
Godly PER, high STR killing machine. Just one Slam can kill an enforcer on a crit.
Mantis
Alone, Mantis the Crime Lord approaches, dragging his blade across the marble floor. The devilish grin is like a permanent scar on his pale face, which is barely visible below the wide brim of his hat. He says: “There are many others like you, broken inside, having lost their true purpose... they all come here sooner or later…”
Once again a reminder that when you enter the black door to the master bedroom, you’re in the very final moments of the game, and won’t be able to back track. Be careful when saving!
We have a few things to check inside before we come face to face with Mantis.
Inside the bedroom, look around and on the nightstand will be the final scripture in the game, Chronicles of Mantis (v25). A damn good read!
Inside the wardrobe you’ll gain a Black Linen Cloak (v6) & Black Slouch Hat (v10). We could now dress like Mantis… interesting…
With 5 PER you can examine the wardrobe more closely to find a hidden compartment.
Wardrobe: Hidden Compartment: 3-5 Laudanum (v50).
That’s everything, no Mantis to be found… until we start to leave.
Final Battle
Head back to the Atrium. 200 exp will be gained and all quests completed.
Now face to face with the focus of your vengeance, you can ask some last questions or demand justice.
The Mantis fight is like no other as it’s in stages. New players can struggle dealing with him as he’s extremely agile, as a proper assassin should be. He has 9 AGI and 4 actions a turn, so he acts often and dodges a lot. Every point of PER takes about 5% off his dodge chance, which is why I keep banging on about PER and Sacred Elixir. Attacks that can’t be evaded (Jab) or that cut his evasion (Cleave, Hamstring, a Sweep) help too, and Slam and Swipe can’t be parried. He loves to Cut, so drink a Sanguine Draught before facing him. If you can damage him enough, the fight moves to the next stage thus giving you a chance to heal, and your advantage meter carries over between stages.
If you attack him once, then you’ll be committed to the fight.
If you’re on the non-violent route, then what the hell are you doing face to face with Mantis and no backup? Retreating is your only option which can lead to 2 different endings.
As such, I’ll detail the stat checks and out of combat actions we can take with Mantis on both routes, then detail how to get each ending.
Retreat from Mantis:
- Retreat.
- Retreat (5 AGI to avoid damage).
- Dodge (6 AGI to avoid damage) or use your shield (any shield equipped for slight damage).
- Retreat.
- Retreat (Near death, enter final choice).
After this we have 3 main options; beg for mercy, close your eyes and pray or accept your fate.
If you successfully convinced Avon Lorca to help then he’ll come to your rescue regardless of what you pick. If you avoided him or didn’t pass both CHA checks then “beg for mercy” can lead to the worst ending, while the other options give a game over.
Fight Mantis:
- Fight him (to roughly two thirds health left).
- Dodge (4 AGI to avoid damage) or use your shield (any shield equipped).
- Fight him (to a bit under 40% health left).
(If hit by the dagger, then there’s an extra step to remove the dagger while Mantis attacks, then you have to defend yourself).
- Avoid the chair.
- Attack (to roughly 25% health left).
- Keep fighting.
- Dodge (5 AGI to avoid damage) or use your shield (any shield equipped).
(If hit by the dagger, then there’s an extra step to remove the dagger but Mantis still retreats).
- Pursue him.
- Use your bow if desired (any bow equipped for Mantis Agility -2).
- Keep pursuing him or move in for the kill (if you shot him).
- Look around and/or Attack him.
From here, if the 12 enforcers are dead, then you get the choice to kill Mantis or hear him out and side with him.
If the 12 enforcers are alive, they will watch you kill Mantis, then you can pick from a few different endings.
All Seven Endings
I’ll only list how to get each ending. I won’t write out each one. That’ll be your pleasure to experience in game. Each ending now has an official title in the game, so I’ve put those first.
Have I written these out in order from best to worst? Maybe… (it’s all personal preference).
The Dark Brigade
- The 12 enforcers are alive.
- Fight and kill Mantis.
- “I am your lord and master. Tremble before my might!”
- “There's a war going on outside. Let us join the fray!”
The Comrade (aka Inspire Avon Lorca)
- Doesn’t matter if the 12 enforcers are alive or not.
- Speak to Avon Lorca and say: “Maybe we can help each other out.”
- Free Avon Lorca from the holding cells.
- Try to convince him to help you before he leaves. Pick both “Sounds like you're afraid of him” (4 CHA) and “No man is immortal…” (5 CHA), and both must succeed.
- Don’t attack Mantis. Only Retreat.
The Unwritten (aka Soul at Peace)
- Doesn’t matter if the 12 enforcers are alive or not.
- Fight and kill Mantis.
- If the 12 enforcers are alive, “My work here is done. Move aside!”
or
- If the 12 enforcers are alive, “I am your lord and master. Tremble before my might!” - “You must leave this place and never return.”
The Master (aka Crime Lord of Noble Heights)
- The 12 enforcers are alive.
- Fight and kill Mantis.
- “I am your lord and master. Tremble before my might!”
- “Clean this place up. I’m going to bed.”
The New Breed (aka Join Mantis)
- The 12 enforcers are dead.
- Fight Mantis.
- Hear him out, keep listening, then take his hand and walk with him.
The Slave (aka Good Dog)
- Doesn’t matter if the 12 enforcers are alive or not.
- Avon Lorca still unfreed, or either of his CHA checks failed or skipped.
- Don’t attack Mantis. Only Retreat.
- Beg for mercy.
- “Yes, I will obey.”
The Avenger (aka Killing Fields)
- The 12 enforcers are alive.
- Fight and kill Mantis.
- “I won’t stop until every last one of you is dead!”
Epilogues
Every ending is now followed by a set of epilogues. Who lives and who dies along the way decides what you hear about afterwards, so spare people if you want to know what became of them! Some of the things that matter:
- Lord Bremerton: release him from the torture chamber and he returns to Highcastle, otherwise his son takes over.
- The Verdandis: leave Cleo and Lucian alive and you’ll hear where they went.
- Madam Brimstone: let her go after dealing with her guard.
- Arturo: deliver him to the militia, or let him get away.
- Mastaba and Mev: help Mastaba in the back alley in Set, and meet Mev on Roe Island after dealing with the Tusk Mob.
- The nomads, the druids of Graefir and Ato’s deserters: how you dealt with them, and whether you plundered the Tomb of Hieronymus.
- The Isle of Bast: whether the Ironclad Vagrant is dead, chained or free.
- Rasleen: only if she survived on Bast.
- Triad Apex: whether you moved the boulder with the iron lever.
The End
So which is your favourite ending? Be sure to jump into the official discord and discuss it!
Final Thoughts
Well this game has been one hell of a journey. Even when I thought I’d seen it all, I would still find hidden things. It wasn’t until I started this guide, that I saw just how much I missed.
Those wanting to min/max their games but still want to pick certain moral choices, such as leaving the poor Set fisherman alive, can enjoy the fact that, even though the level cap is 20, there simply isn’t enough exp in the game to get past level 15. Level 15 is only possible when you kill the 12 enforcers. As such, you can easily forgo a certain amount of experience points in favour of moral choices, higher gold routes or unique items.
Want to watch Mev burn? Don’t care about the nomads? Leave certain characters alive? All this can be done, and as long as you still reach level 15 when killing all the enforcers, then nothing is truly lost to the min/maxer.
Those who don’t care about min/max, then more power to you! Enjoy the game however you like. I’m way too OCD to have good honest fun like that.
Reaching level 14 takes a max of 3800 exp, and level 15 requires 800 more at 4600 exp.
Considering the fact that killing the 12 enforcers gives 550 exp, and facing Mantis gives 200 exp, I would say that a rough amount of up to 700 exp can be lost on a playthrough for you to still reach level 14, yet reach 15 if desired. (Make it 600 exp to be safe).
If someone wants to go through the entire guide and crunch the numbers then feel free and I’ll update this section. But even if wanting level 15 before the, no backtrack 200 Mantis exp, then that's still roughly like 400 exp that a player can lose in favour of other routes. Not too shabby!
Not like any of this actually matters! It’s just my damn OCD talking. Just enjoy the game!
If by some magic you’ve read this guide and aren’t on the discord, then here's the invite:
If you notice any errors in this guide then please don’t hesitate to jump into the discord and let me know.
Likewise, if you have anything you would like to add to the guide, any pointers or alternatives.
Acknowledgements
A huge thank you to the dev team for this marvelous creation. On the discord you’ll know them as maskpo and insats, with the fantastic soundtrack done by Befly.
Listen to it here! https://www.youtube.com/watch?v=-u_kvpfSJYo
Many thanks to Ringerill, Befly and Rash for safeguarding the community, and a big thank you to MerrickGreen for helping fact check many points in this guide, as well as maskpo and insats answering any questions I had.
More thanks go to the group of players who worked out how to kill the Iron Vagrant. BlueOnik laid down the foundations of the strategy and Aenhart was the first player to make it work, with input from Ringerill, myself and the long lost seeker of truth, only known as John. Wherever you are, we miss you bud!
Finally, the last thanks goes to you! Yes you, who read all 80+ pages of this dang guide.
If I’ve left anyone out, I’m truly sorry, blame my tired brain.
Be seeing you all again for Eldrum 2!